|
|
Collision Type #1: |
The Right Cross |
 This is the most common ways to get hit (or almost get hit).(source) A car is pulling out of a side street, parking lot, or driveway on the right. Notice that there are actually two possible kinds of collisions here: Either you're in front of the car and the car hits you, or the car pulls out in front of you and you slam into it. This is the most common ways to get hit (or almost get hit).(source) A car is pulling out of a side street, parking lot, or driveway on the right. Notice that there are actually two possible kinds of collisions here: Either you're in front of the car and the car hits you, or the car pulls out in front of you and you slam into it.
How to avoid this collision:
1. Get a headlight. If you're riding at night, you should absolutely use a front headlight. It's required by law, anyway. Even for daytime riding, a bright white light that has a flashing mode can make you more visible to motorists who might otherwise Right Cross you. Look for the new LED headlights which last ten times as long on a set of batteries as old-style lights. And helmet- or head-mounted lights are the best, because then you can look directly at the driver to make sure they see your light.
2. Honk. Get a loud horn and use it whenever you see a car approaching (or waiting) ahead of you and to the right. If you don't have a horn, then yell "Hey!" You may feel awkward honking or yelling, but it's better to be embarrassed than to get hit. Incidentally, many countries require bells on bicycles, but the U.S. doesn't.
3. Slow down. If you can't make eye contact with the driver (especially at night), slow down so much that you're able to completely stop if you have to. Sure, it's inconvenient, but it beats getting hit. Doing this has saved my life on too many occasions to count.
4. Ride further left. You're probably used to riding in the "A" line in the picture, very close to the curb, because you're worried about being hit from behind. But take a look at the car. When that driver is looking down the road for traffic, he's not looking in the bike lane or the area closest to the curb; he's looking in the middle of the lane, for other cars. The farther left you are (such as in "B"), the more likely the driver will see you. There's an added bonus here: if the motorist doesn't see you and starts pulling out, you may be able to go even farther left, or may be able to speed up and get out of the way before impact, or easily roll onto their hood as they slam on their brakes. In short, it gives you some options. Because if you stay all the way to the right and they pull out, your only "option" may be to run right into the driver's side door. Using this method has saved me on three occasions in which a motorist ran into me slowly as they hit their brakes and I wasn't hurt, and in which I definitely would have slammed into the driver's side door had I not moved left.
Of course, there's a tradeoff. Riding to the far right makes you invisible to the motorists ahead of you at intersections, but riding to the left makes you more vulnerable to the cars behind you. Your actual lane position may vary depending on how wide the street is, how many cars there are, how fast and how close they pass you, and how far you are from the next intersection. On fast roadways with few cross streets, you'll ride farther to the right, and on slow roads with many cross streets, you'll ride farther left. See lane position for more about this.
|
Collision Type #2: |
The Door Prize |
 A driver opens his door right in front of you. You run right into it if you can't stop in time. If you're lucky, the motorist will exit the car before you hit the door, so you'll at least have the pleasure of smashing them too when you crash, and their soft flesh will cushion your impact. This kind of crash is more common than you might think, and in fact cyclists crashing into parked cars is the #1 kind of car-bike collision in Santa Barbara. (source)We've compiled a list of cyclists killed by running into open car doors. A driver opens his door right in front of you. You run right into it if you can't stop in time. If you're lucky, the motorist will exit the car before you hit the door, so you'll at least have the pleasure of smashing them too when you crash, and their soft flesh will cushion your impact. This kind of crash is more common than you might think, and in fact cyclists crashing into parked cars is the #1 kind of car-bike collision in Santa Barbara. (source)We've compiled a list of cyclists killed by running into open car doors.
How to avoid this collision:
Ride to the left. Ride far enough to the left that you won't run into any door that's opened unexpectedly. You may be wary about riding so far into the lane that cars can't pass you easily, but you're more likely to get doored by a parked car if you ride too close to it than you are to get hit from behind by a car which can clearly see you.
|
Collision Type #3: |
The Crosswalk Slam | 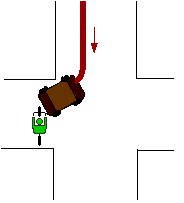 You're riding on the sidewalk and cross the street at a crosswalk, and a car makes a right turn, right into you. Drivers aren't expecting bikes in the crosswalk, and it's hard for them to see you because of the nature of turning from one street to another, so it's very easy for you to get hit this way. In fact, this collision is so common we've lost track of the number of people who've told us they were hit this way, such as Ray John Ray. One study showed that sidewalk-riding was twice as dangerous as road riding, and another study said it's even more dangerous than that. You're riding on the sidewalk and cross the street at a crosswalk, and a car makes a right turn, right into you. Drivers aren't expecting bikes in the crosswalk, and it's hard for them to see you because of the nature of turning from one street to another, so it's very easy for you to get hit this way. In fact, this collision is so common we've lost track of the number of people who've told us they were hit this way, such as Ray John Ray. One study showed that sidewalk-riding was twice as dangerous as road riding, and another study said it's even more dangerous than that.
How to avoid this collision:
1. Get a headlight. If you're riding at night, you should absolutely use a front headlight. It's required by law, anyway.
2. Slow down. Slow down enough that you're able to completely stop if necessary.
3. Don't ride on the sidewalk in the first place. Crossing between sidewalks is a fairly dangerous maneuver. If you do it on the left-hand side of the street, you risk getting slammed as per the diagram. If you do it on the right-hand side of the street, you risk getting slammed by a car behind you that's turning right. Sidewalk riding also makes you vulnerable to cars pulling out of parking lots or driveways. And you're threatening to pedestrians on the sidewalk, who could get hurt if you hit them. These kinds of accidents are hard to avoid, which is a compelling reason to not ride on the sidewalk in the first place. In addition, riding on the sidewalk is illegal in some places.
Some special sidewalks are safe to ride on. If the sidewalk is really long (no need to frequently cross streets), and free of driveways and peds, then there's little risk to you and others. Just make sure when you do cross a street or driveway that you slow down considerably and that you check the traffic in all directions, especially behind you if you're riding with the flow of traffic.
|
Collision Type #4: |
The Wrong-Way Wreck | 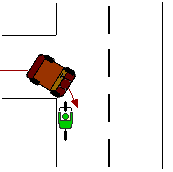 You're riding the wrong way (against traffic, on the left-hand side of the street). A car makes a right turn from a side street, driveway, or parking lot, right into you. They didn't see you because they were looking for traffic only on their left, not on their right. They had no reason to expect that someone would be coming at them from the wrong direction. You're riding the wrong way (against traffic, on the left-hand side of the street). A car makes a right turn from a side street, driveway, or parking lot, right into you. They didn't see you because they were looking for traffic only on their left, not on their right. They had no reason to expect that someone would be coming at them from the wrong direction.
Even worse, you could be hit by a car on the same road coming at you from straight ahead of you. They had less time to see you and take evasive action because they're approaching you faster than normal (because you're going towards them rather than away from them). And if they hit you, it's going to be much more forceful impact, for the same reason. (Both your and their velocities are combined.)
How to avoid this collision:
Don't ride against traffic. Ride with traffic, in the same direction.
Riding against traffic may seem like a good idea because you can see the cars that are passing you, but it's not. Here's why:
- Cars which pull out of driveways, parking lots, and cross streets (ahead of you and to the left), which are making a right onto your street, aren't expecting traffic to be coming at them from the wrong way. They won't see you, and they'll plow right into you.
- How the heck are you going to make a right turn?
- Cars will approach you at a much higher relative speed. If you're going 15mph, then a car passing you from behind doing 35 approaches you at a speed of only 20 (35-15). But if you're on the wrong side of the road, then the car approaches you at 50 (35+15), which is more than twice as fast! Since they're approaching you faster, both you and the driver have lots less time to react. And if a collision does occur, it's going to be ten times worse.
- Riding the wrong way is illegal and you can get ticketed for it.
One study showed that riding the wrong way was three times as dangerous as riding the right way, and for kids, the risk is seven times greater. (source)
Nearly one-fourth of crashes involve cyclists riding the wrong way. (source) Some readers have challenged this, saying if 25% of crashes are from going the wrong way, then riding the right way is more dangerous because it accounts for 75% of crashes. That thinking is wrong. First off, only 8% of cyclists ride the wrong way, yet nearly 25% of them get hit -- meaning wrong-way cyclists really are three times more likely to get hit than those who ride the proper way. Second, the problem with wrong-way biking is that it promotes crashes, while right-way biking does not. For example, cyclists running stop signs or red lights is 17% of their crashes. (source) But do we therefore conclude that not running signals causes 83% of crashes?! (Hint: No.)
|
Collision Type #5: |
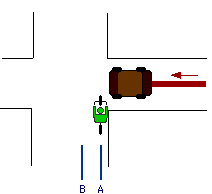
Red Light of Death | 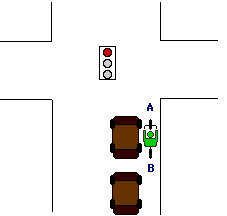 You stop to the right of a car that's already waiting at a red light or stop sign. They can't see you. When the light turns green, you move forward, and then they turn right, right into you. Even small cars can do you in this way, but this scenario is especially dangerous when it's a bus or a semi that you're stopping next to. An Austin cyclist was killed in 1994 when he stopped to the right of a semi, and then it turned right. He was crushed under its wheels. You stop to the right of a car that's already waiting at a red light or stop sign. They can't see you. When the light turns green, you move forward, and then they turn right, right into you. Even small cars can do you in this way, but this scenario is especially dangerous when it's a bus or a semi that you're stopping next to. An Austin cyclist was killed in 1994 when he stopped to the right of a semi, and then it turned right. He was crushed under its wheels.
How to avoid this collision:
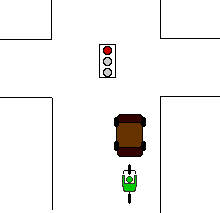
Don't stop in the blind spot. Simply stop BEHIND a car, instead of to the right of it, as per the diagram below. This makes you very visible to traffic on all sides. It's impossible for the car behind you to avoid seeing you when you're right in front of it.
 Another option is to stop at either point A in the diagram above (where the first driver can see you), or at point B, behind the first car so it can't turn into you, and far enough ahead of the second car so that the second driver can see you clearly. It does no good to avoid stopping to the right of the first car if you're going to make the mistake of stopping to the right of the second car. EITHER car can do you in. Another option is to stop at either point A in the diagram above (where the first driver can see you), or at point B, behind the first car so it can't turn into you, and far enough ahead of the second car so that the second driver can see you clearly. It does no good to avoid stopping to the right of the first car if you're going to make the mistake of stopping to the right of the second car. EITHER car can do you in.
If you chose spot A, then ride quickly to cross the street as soon as the light turns green. Don't look at the motorist to see if they want to go ahead and turn. If you're in spot A and they want to turn, then you're in their way. Why did you take spot A if you weren't eager to cross the street when you could? When the light turns green, just go, and go quickly. (But make sure cars aren't running the red light on the cross street, of course.)
If you chose spot B, then when the light turns green, DON'T pass the car in front of you -- stay behind it, because it might turn right at any second. If it doesn't make a right turn right away, it may turn right into a driveway or parking lot unexpectedly at any point. Don't count on drivers to signal! They don't. Assume that a car can turn right at any time. (NEVER pass a car on the right!) But try to stay ahead of the car behind you until you're through the intersection, because otherwise they might try to cut you off as they turn right.
While we're not advocating running red lights, notice it is in fact safer to run the red light if there's no cross traffic, than it is to wait legally at the red light directly to the right of a car, only to have it make a right turn right into you when the light turns green. The moral here is not that you should break the law, but that you can easily get hurt even if you follow the law.
By the way, be very careful when passing stopped cars on the right as you approach a red light. You run the risk of getting doored by a passenger exiting the car on the right side, or hit by a car that unexpectedly decides to pull into a parking space on the right side of the street.
|
Collision Type #6: |
The Right Hook |  A car passes you and then tries to make a right turn directly in front of you, or right into you. They think you're not going very fast just because you're on a bicycle, so it never occurs to them that they can't pass you in time. Even if you have to slam on your brakes to avoid hitting them, they often won't feel they've done anything wrong. This kind of collision is very hard to avoid because you typically don't see it until the last second, and because there's nowhere for you to go when it happens. A car passes you and then tries to make a right turn directly in front of you, or right into you. They think you're not going very fast just because you're on a bicycle, so it never occurs to them that they can't pass you in time. Even if you have to slam on your brakes to avoid hitting them, they often won't feel they've done anything wrong. This kind of collision is very hard to avoid because you typically don't see it until the last second, and because there's nowhere for you to go when it happens.
How to avoid this collision:
1. Don't ride on the sidewalk. When you come off the sidewalk to cross the street you're invisible to motorists. You're just begging to be hit if you do this. Keith Vick was killed this way in Austin, TX in Dec. 2002.
2. Ride to the left. Taking up the whole lane makes it harder for drivers to pass you to cut you off or turn into you. Don't feel bad about taking the lane: if motorists didn't threaten your life by turning in front of or into you or passing you too closely, then you wouldn't have to. If the lane you're in isn't wide enough for cars to pass you safely, then you should be taking the whole lane anyway. Lane position is discussed in more detail below.
3. Glance in your mirror before approaching an intersection. (If you don't have a handlebar or helmet mirror, get one now.) Be sure to look in your mirror well before you get to the intersection. When you're actually going through an intersection, you'll need to be paying very close attention to what's in front of you.
|
Collision Type #7: |
The Right Hook, Pt. 2 | 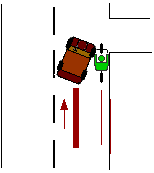 You're passing a slow-moving car (or even another bike) on the right, when it unexpectedly makes a right turn right into you, trying to get to a parking lot,driveway or side street. You're passing a slow-moving car (or even another bike) on the right, when it unexpectedly makes a right turn right into you, trying to get to a parking lot,driveway or side street.
How to avoid this collision:
1. Don't pass on the right. This collision is very easy to avoid. Just don't pass any vehicle on the right. If a car ahead of you is going only 10 mph, then you slow down, too, behind it. It will eventually start moving faster. If it doesn't, pass on the left when it's safe to do so.
When passing cyclists on the left, announce "on your left" before you start passing, so they don't suddenly move left into you. (Of course, they're much less likely to suddenly move left without looking, where they could be hit by traffic, then to suddenly move right, into a destination.) If they're riding too far to the left for you to pass safely on the left, then announce "on your right" before passing on the right.
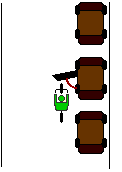
If several cars are stopped at a light, then you can try passing on the right cautiously. Remember that someone can fling open the passenger door unexpectedly as they exit the car. Also remember that if you pass on the right and traffic starts moving again unexpectedly, you may suffer #3, the Red Light of Death.
Note that when you're tailing a slow-moving vehicle, ride behind it, not in its blind spot immediately to the right of it. Even if you're not passing a car on the right, you could still run into it if it turns right while you're right next to it. Give yourself enough room to brake if it turns.
2. Look behind you before turning right. Here's your opportunity to avoid hitting cyclists who violate tip #1 above and try to pass you on the right. Look behind you before making a right-hand turn to make sure a bike isn't trying to pass you. (Also remember that they could be coming up from behind you on the sidewalk while you're on the street.) Even if it's the other cyclist's fault for trying to pass you on the right when you make a right turn and have them slam into you, it won't hurt any less when they hit you.
|
Collision Type #8: |
The Left Cross | 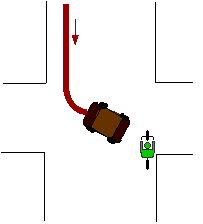 A car coming towards you makes a left turn right in front of you, or right into you. This is similar to #1, above. Austin cyclists hit this way include Dr. Lee Chilton, John Howell (former president of the Austin Cycling Association), and Janne Osborne. A car coming towards you makes a left turn right in front of you, or right into you. This is similar to #1, above. Austin cyclists hit this way include Dr. Lee Chilton, John Howell (former president of the Austin Cycling Association), and Janne Osborne.
How to avoid this collision:
1. Don't ride on the sidewalk. When you come off the sidewalk to cross the street, you're invisible to turning motorists.
2. Get a headlight. If you're riding at night, you should absolutely use a front headlight. It's required by law in most countries, anyway.
3. Wear something bright, even during the day. It may seem silly, but bikes are small and easy to see through even during the day. Yellow or orange reflective vests really make a big difference. Reflective leg bands are also easy and inexpensive.
4. Don't pass on the right. Don't overtake slow-moving vehicles on the right. Doing so makes you invisible to left-turning motorists at intersections. Passing on the right means that the vehicle you're passing could also make a right turn right into you, too.
5. Slow down. If you can't make eye contact with the driver (especially at night), slow down so much that you're able to completely stop if you have to. Sure, it's inconvenient, but it beats getting hit.
|
Collision Type #9: |
The Rear End |   You innocently move a little to the left to go around a parked car or some other obstruction in the road, and you get nailed by a car coming up from behind. You innocently move a little to the left to go around a parked car or some other obstruction in the road, and you get nailed by a car coming up from behind.
How to avoid this collision:
1. Never, ever move left without looking behind you first. Some motorists like to pass cyclists within mere inches, so moving even a tiny bit to the left unexpectedly could put you in the path of a car. Practice holding a straight line while looking over your shoulder until you can do it perfectly. Most new cyclists tend to move left when they look behind them, which of course can be disastrous.
2. Don't swerve in and out of the parking lane if it contains any parked cars. You might be tempted to ride in the parking lane where there are no parked cars, dipping back into the traffic lane when you encounter a parked car. This puts you at risk for getting nailed from behind. Instead, ride a steady, straight line in the traffic lane.
3. Use a mirror. If you don't have one, get one from a bike shop or an online shop right now. There are models that fit on your handlebars, helmet, or glasses, as you prefer. You should always physically look back over your shoulder before moving left, but having a mirror still helps you monitor traffic without constantly having to look behind you.
4. Signal. Never move left without signaling. Just put your left arm straight out. Be sure to check your mirror or loo behind you before signaling (since a car passing too closely can take your arm out).
|
Collision Type #10: |
The Rear End, Pt. 2 |  A car runs into you from behind. This is what many cyclists fear the most, but it's actually not very common, comprising only 3.8% of collisions. (source) However, it's one of the hardest collisions to avoid, since you're not usually looking behind you. The risk is likely greater at night, and in rides outside the city where traffic is faster and lighting is worse. The three cyclists killed when hit from behind in Austin in 96-97 were all riding at night, and at least two of them didn't have lights on their bikes. (source) The best way to avoid getting Rear-Ended is to ride on very wide roads or in bike lanes, or on roads where the traffic moves slowly, and to use lights when biking at night. A car runs into you from behind. This is what many cyclists fear the most, but it's actually not very common, comprising only 3.8% of collisions. (source) However, it's one of the hardest collisions to avoid, since you're not usually looking behind you. The risk is likely greater at night, and in rides outside the city where traffic is faster and lighting is worse. The three cyclists killed when hit from behind in Austin in 96-97 were all riding at night, and at least two of them didn't have lights on their bikes. (source) The best way to avoid getting Rear-Ended is to ride on very wide roads or in bike lanes, or on roads where the traffic moves slowly, and to use lights when biking at night.
How to avoid this collision:
1. Get a rear light. If you're riding at night, you absolutely should use a flashing red rear light. Bruce Mackey (formerly of Florida, now head of bike safety in Nevada) says that 60% of bike collisions in Florida are caused by cyclists riding at night without lights. In 1999, 39% of deaths on bicycles nationwide occurred between 6 p.m. and midnight. [USA Today, 10-22-01, attributed to the Insurance Institute for highway safety]
Bike shops have red rear blinkies for $15 or less. These kind of lights typically take two AA batteries, which last for months (something like 200 hours). I can't stress this item enough: If you ride at night, get a rear light!
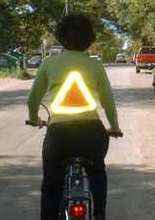 2. Wear a reflective vest or a safety triangle. High quality reflective gear makes you a lot more visible even in the day time, not just at night. I had a friend ride away from me while wearing one during the day, and when she was about a quarter mile away, I couldn't see her or her bike at all, but the vest was clearly visible. At night the difference is even greater. Bike shops have vests and triangles for $10 to $15. Also, when you hear a motorist approaching, straightening up into a vertical position will make your reflective gear more noticeable. 2. Wear a reflective vest or a safety triangle. High quality reflective gear makes you a lot more visible even in the day time, not just at night. I had a friend ride away from me while wearing one during the day, and when she was about a quarter mile away, I couldn't see her or her bike at all, but the vest was clearly visible. At night the difference is even greater. Bike shops have vests and triangles for $10 to $15. Also, when you hear a motorist approaching, straightening up into a vertical position will make your reflective gear more noticeable.
3. Choose wide streets. Ride on streets whose outside lane is so wide that it can easily fit a car and a bike side by side. That way a car may zoom by you and avoid hitting you, even if they didn't see you!
4. Choose slow streets. The slower a car is going, the more time the driver has to see you. I navigate the city by going through neighborhoods. Learn how to do this.
5. Use back streets on weekends. The risk of riding on Friday or Saturday night is much greater than riding on other nights because all the drunks are out driving around. If you do ride on a weekend night, make sure to take neighborhood streets rather than arterials.
6. Get a mirror. Get a mirror and use it. If it looks like a car doesn't see you, hop off your bike and onto the sidewalk. Mirrors cost $5-15. Trust me, once you've ridden a mirror for a while, you'll wonder how you got along without it. My paranoia went down 80% after I got a mirror. If you're not convinced, after you've used your mirror for a month, take it off your bike and ride around and notice how you keep glancing down to where your mirror was, and notice how unsafe you feel without it.
7. Don't hug the curb. This is counter-intuitive, but give yourself a little space between yourself and the curb. That gives you some room to move into in case you see a large vehicle in your mirror approaching without moving over far enough to avoid you. Also, when you hug the curb tightly you're more likely to suffer a right cross from motorists who can't see you. |
New additions:
Sample Fan Mail
Fantastic web site! I've been a bicycle commuter for about 13 years now and I think you've nailed it very nicely. I was recently clipped while passing a slow-moving truck and trailer on the right in a dedicated right-turn lane. I've ridden the same route for over 6 years but failed to follow your advice about busy roads [and about not passing on the right!]. During that time traffic got worse and worse while I became more and more complacent. While passing that truck and trailer, a dually pickup passing me up on my left, caught my handlebar with its rear flared out fender, and took me down in a busy intersection. We were both going about the same speed so it was the pavement that did the hurting, but we were doing about 30mph. My helmet was crushed from the impact and I broke 3 ribs along with the usual road rash and a perforation in one arm from some road debris. Obviously I was lucky, the helmet worked so well, I didn't even gat a headache. But it points out the need to reassess your route periodically and be willing to change your route accordingly. --Adam Fischer, Riverside, CA
I just read your BicycleSafe article. I've been riding in cities (mainly Cleveland and Winnipeg) for 45 years or so. I've experienced all of the types of incident you describe. Fortunately I only got knocked off the bike once many years ago - a left cross in a thunderstorm going too fast with a gale behind me - dummy! Bike brakes don't work as well in the rain and drivers don't have the visibility.
I'd encourage cyclists to keep the speed below about 15 MPH in city traffic. At that speed, I find I have the reaction time and stopping distance to handle most emergencies.
Thanks for posting the article. I bet you save a few lives! --Alan McIlwain, August 2006
I just wanted to let you know how much I appreciated your Bicycle Safety site. I biked to work for the first time here in S.F. today, and although my time on a motorcycle made me rightfully paranoid, I see I made a lot of small mistakes that could add up to a big problem some unlucky day. So, I totally appreciate that you took the time to put bicyclesafe.com together. --Josh Krist, author of San Francisco: The Unknown City, June 2006
Thanks for your site. I just experienced the Right Hook Part 1 yesterday. Your site makes me feel better knowing that these things happen to bicyclists everywhere. Anywho, thanks! -- Natalie Ma, May 2006
Your website is great! I've been biking to work every day for a year and a half, and I really wish I had seen your site first. I'm referring people (especially those who have never bike commuted) to your site now as I'm coordinating a Bike to Work Day event at my office. Your approach to safe, defensive bike riding and the illustrations you use are greatly appreciated! Many thanks! -- Jessi Hafer, Fresno, CA, May 2006
See more fan mail.
Safe Road Riding Game/Quiz
The Pennsylvania Dept. of Transportation has an excellent Safe Road Riding Game/Quiz. Most bike safety stuff I see tells you little more than to wear your helmet and follow the law -- as though it were that easy to be safe. But PennDOT's quiz presents real-world scenarios: How do you avoid that car door opening in front of you? What do you do when you're approaching a sewer grate? Good stuff.
Reflective Stickers
Stickers help you be seen by cars, even during the day. Here are some sites selling reflective stickers and tape:
Lighting
These are neat:
Reflective Clothing
Other Bicycle Safety Resources
Ken Kifer's Bike Safety pages
Urban Cycling's directory of bike safety advice from various sources
Bicycle Safety equipment
|
Book:
The Art of Urban Cycling

The Urban Cycling Manual dismantles the urban cycling experience and slides it under the microscope, piece by piece. Author Robert Hurst discusses how, in America, bicyclists were an afterthought at best when our cities were planned and built, and today are left to navigate through a hard and unsympathetic world that was not made for them--like rats in a sewer. Yet, with the proper attitude and a bit of knowledge, urban cyclists will thrive in this hostile environment. The primary concern is safety, but this book goes well beyond the usual tips and how-to, diving in to the realms of history, psychology, sociology, and economics. It empowers readers with the Big Picture of urban cycling--and gives urban cyclists many useful insights to consider while pedaling the next commute or grocery run. Riding a bike in the city will never be the same. -- by the publisher
$14.95 - Buy Now |
Bicycle Safety Statistics
Our sister site has everything we know about bicycle safety statistics. That's it, that's all we have, no need to ask if we have anything more.
Why you don't see "wear a helmet" advice plastered all over this site
Everybody asks about this one, so here's the answer.
Links
See the other sites which link to us.
Note to "Effective Cycling" fans
If you're about to send me an email telling me how stupid the advice on this site is, please save yourself the trouble. Trust me, I've heard all the arguments before (ad nauseum) and I simply disagree. I never write to EC websites to complain that I don't like their advice, so there's no need for you to complain about mine. (Here's more about the the difference of opinion for those wondering what the fuss is about.)
Reprint & Link Permission
I'm happy to share this information with others at no cost. Permission to reprint is given freely, subject to the following provisions:
- Linking. Feel free to link to this page. The direct url is http://BicycleSafe.com. Here's a list of sites which link to us. If you'd like to link with a banner, feel free to use the How to Not Get Hit banner near the top of this page.
- Reproduction on websites. Feel free to reproduce any or all of the "How to Not Get Hit" article on your website, with or without modification. (Note that you will need to host the images yourself.) Just make sure to link back to this site in the credits of your page.
- Reproduction in printed form. Feel free to reproduce this content in printed form (newsletter, ride brochure, etc.), with or without modification, but please list BicycleSafe.com or Michael Bluejay in the credits.
- Your publication must be free. You're free to republish this info and redistribute it for free, but you can't charge for it. Daily/weekly newspapers and newsletters that go out only to paid members of a cycling club are okay.
The contents of BicycleSafe.com are Copyright ?998-2008 by Michael Bluejay and may not be sold for profit.
Disclaimer
I have developed this page to provide what I believe is very good advice to help you avoid getting hit by cars. But of course, bicycling will never be 100% safe, and I can't guarantee you won't get hit by a car, even if you follow all the advice on this page. (Naturally, I believe if you follow this advice you will be much less likely to suffer a collision than if you ignore it.) Ultimately, you are responsible for your own safety.
A plug for another site of mine. I was born into a cult called Aesthetic Realism. Recently I created a website to share my experiences as a former member. You can visit it at my Aesthetic Realism site. |

 "The bike LeMond rode to victory in the 1983 World Championships. His teammate Bernard Hinault won the Tour on a somewhat similar Gitane the year before. (Photo: User airmailv2 on flickr.com)")


![[http]](http://angelhalowiki.com/r1/imgs/http.png)


 winter-clothing-list.pdf