'자전거 /Tech'에 해당되는 글 33건</h3>

  1. 2014.01.20 When to use standing versus seated pedaling - http://www.humankinetics.com/excerpts/excerpts/when-to-use-standing-versus-seated-pedaling
  2. 2013.08.25 6600, 6700 lever + brake
  3. 2011.02.04 Optimizing Your Tire Pressure for Your Weight 1
  4. 2011.01.21 SPOKE LENGTH TOLERANCE - http://spokeanwheel.110mb.com/lacingsl.htm
  5. 2011.01.21 Wheel Building - http://www.troubleshooters.com/bicycles/wheelbuilding/index.htm
  6. 2011.01.20 Triathlon Bicycles – Do Slow Riders Save More Time? - http://triathlonbikesonline.com/triathlon-bikes/triathlon-bicycles-%E2%80%93-do-slow-riders-save-more-time/
  7. 2011.01.20 The slower you go, the more benefit there is to aero equipment
  8. 2011.01.20 Biggest Bang For Your Buck In Time Trial Equipment - http://www.ridestrong.org.nz/RS/wikis/getting_started/biggest-bang-for-your-buck-in-time-trial-equipment.aspx
  9. 2011.01.15 An Overview of Material Applications in Bicycle Frames - http://www.fitwerx.com/an-overview-of-material-applications-in-bicycle-frames
  10. 2011.01.15 Bicycle Aerodynamics - http://www.fitwerx.com/bicycle-aerodynamics
  11. 2011.01.11 TECH INFO – AERODYNAMIC RESULTS
  12. 2010.12.30 Crank Length – Does Size Really Matter? - http://pezcyclingnews.com/?pg=fullstory&id=8845
  13. 2010.12.16 Wheel Drag result
  14. 2010.12.11 Wheel Stiffness Test (DRAFT) - http://www.sheldonbrown.com/rinard/wheel/index.htm
  15. 2010.11.19 TWP Critical Power Calculator - http://www.trainwithpower.co.uk/TestYourself/CriticalTest/tabid/388/language/en-US/Default.aspx
  16. 2010.08.12 10 Weight Loss Tips From Pro Cyclists - http://www.active.com/cycling/Articles/10-Weight-Loss-Tips-From-Pro-Cyclists.htm?cmp=276&memberid=96954122&lyrisid=20900594
  17. 2010.08.11 Warm-up Routines - http://www.flammerouge.je/content/3_factsheets/constant/warmup.htm
  18. 2010.08.11 Time Trial Strategies - http://www.flammerouge.je/content/3_factsheets/constant/ttstrat.htm
  19. 2010.08.11 Functional Threshold Power - http://www.flammerouge.je/content/3_factsheets/constant/functhresh.htm
  20. 2010.08.07 Road Wheel Weights - http://schwabcycles.com/about/wheel-comparison-weights-pg292.htm 1

When to use standing versus seated pedaling - http://www.humankinetics.com/excerpts/excerpts/when-to-use-standing-versus-seated-pedaling

|

Standing Versus Seated Pedaling

The first and most obvious weight-bearing exercise is running. A lot of energy is required not only to propel yourself forward but also to keep yourself upright and stable. Added to that is the impact force from landing on your feet with each stride. The combination of the two makes for a much higher heart rate, a greater metabolic rate, and more overall stress when running compared with cycling. Cycling is mostly a non-weight-bearing activity, and the bicycle is a highly efficient machine because it removes the impact forces and cradles your body in a position that greatly minimizes the need to support your body weight. But at times you have to stand when riding, and then you have to support a good deal of your body weight (figure 8.8). Whether it’s on the flats, in the hills, or in a sprint, you are no longer supporting your weight on the saddle, and you have to rely on your muscles more to keep yourself upright.

Of course, standing typically requires more energy and makes you less economical, but it also leverages more of your body weight over the pedals and recruits additional muscles, thus making higher power output possible. For this reason, we’re generally taught to keep the standing to a minimum and to stand only when we need extra power, such as when initiating an acceleration (e.g., sprint, breakaway) or when we need extra power while climbing. Wind resistance is also higher while standing because of the larger surface area exposed.

Millet et al. (2002) tested fit elite and pro cyclists riding for 6 minutes at 75 percent of V?O2max in a velodrome and while seated or standing on a 5.3 percent gradient hill. The cyclists also performed 30-second all-out sprints in the lab and while seated and standing on a gradual hill. Thanks to the improvements in technology, the researchers could take this study out into real terrain and use the subjects’ own SRM-equipped bikes with portable gas analyzers, increasing the applicability of the study. As expected, heart rate was about eight beats per minute higher when standing compared with seated uphill. Ventilation was also higher, although no differences were seen in oxygen consumption. Cadence was similar at just under 60 revolutions per minute in both conditions. Most important, no differences were found in either gross efficiency (about 22.5 percent) or economy (4.7 kilojoules of power per liter of oxygen). In the 30-second tests, maximum and mean power were much higher in the standing position compared with the seated position (mean power of about 820 and 650 watts, respectively), despite similar cadences and blood lactate values.

Overall, the ability to produce higher power when sprinting and standing is obvious and intuitive, as are the higher heart rates when climbing and standing. The main novelty of the study comes in the analysis of efficiency, especially the finding that no differences occur in efficiency or economy whether standing or seated. This result means that, although standing creates more stress on the aerobic and cardiovascular system, it does not necessarily cause a decrease in efficiency itself. So standing is not going to cost more energy to perform when you factor in the greater power that you are generating. One obvious caveat is that extended standing while climbing must be practiced to optimize economy. Another caveat is that all the subjects in the study were young, lean, and light, averaging 67 kilograms. For bigger riders with more weight to support, the efficiency and economy equations might be tilted in favor of sitting.


Read more from Cutting-Edge Cycling by Hunter Allen and Stephen Cheung.


And

6600, 6700 lever + brake

|

Brakes may be a pretty straightforward thing to control, but the amount of cable pulled for a given amount of lever movement is an important variable that affects their feel a great deal. This changed significantly between 6700 and 6600.

Using 6700 levers with 6600 brakes will make it feel very different. It will feel much more soft/spongy, but you will have sufficient power if you squeeze enough. The opposite combination is not recommended - 6700 brakes with 6600 levers - you then have a hard/solid feel, but very little power.

And

Optimizing Your Tire Pressure for Your Weight

|
And

SPOKE LENGTH TOLERANCE - http://spokeanwheel.110mb.com/lacingsl.htm

|
SPOKE LENGTH TOLERANCE
After you have determined the spoke length you will need for your wheel, you will obviously have to get spokes close to those lengths. Some shops only stock spokes in even lengths, and some spokes are only made in even lengths. Whether or not you can get spokes in single millimeter (mm) increments or only even mm lengths, you need to convert your calculated length to the proper length of the spokes available to you.
 
As was briefly mentioned on the Home page, you also need to compensate the spoke length according to the type of wheel, where on the wheel, and the lacing pattern the spoke is going to be used for. You will need to be aware of any offset or stagger of the spoke holes on the rim you are using as well in order to make accurate compensations. Rim stagger and offset adjustments are discussed on the MEASURE page. Spokes that are a little too short are better than ones that are a little too long. So if you compensate a little too much there should be no problem. If, however, the spokes end up being too long, you could try to still use them by adding a crossing, the FIXES FOR SOME PROBLEMS chapter discusses this problem.
 
Spokes do stretch when you are building a wheel from the tension, and the thinner they are (including the middle of butted spokes) the more they stretch. In multi-speed rear wheels (those with freehubs or freewheels), the drive side spokes stretch the most. Front wheel spoke stretch is less than the drive side spokes, but more than non drive side spokes. Single speed and internally geared hub rear wheel spokes have about the same stretch as front wheel spokes. Any spoked wheel with either no dish offset or only a slight amount (like front disc brake wheels) should go with the compensation for front wheels. See the GENERAL WHEEL LACING for more information about dish offset.
 
The following paragraphs are organized in the logical order to figure out the compensations to calculate the spoke length. The best way to work these compensations into the formula is to subtract the compensation from the RRSP value. These compensations should work fine for 28, 32, and 36 spoke wheels. For 48 spoke wheels compensate 1mm less, for less than 28 spokes compensate 1mm more.
 
For drive side spokes start by subtracting 1mm as a general compensation. For 14 gauge spokes, if you are using a 3-cross pattern subtract 1mm more, if you are using a 4-cross pattern subtract 2mm more. With 14 gauge spokes radial or 2-cross lacing's do not need another compensation. If you are using 14-15-14 butted spokes subtract 1mm more for a radial or 2-cross pattern, 2mm more for a 3-cross pattern and 3mm more for a 4-cross pattern. I do not suggest using 15 gauge straight spokes, or a butted spoke smaller than 14-15-14 for the drive side.
 
For non drive side spokes that are either 14 gauge, 15 gauge, or 14-15-14 butted, you can use the same cross pattern compensations listed above for 14 gauge spokes but without the general 1mm compensation. For 15-16-15 butted spokes, or butted spokes with a middle section smaller than 16 gauge, use the compensation values for the 14-15-14 butted spokes above without the general compensation.
 
For front or other low dish offset wheels subtract 1mm from the RRSP value as a general compensation. If you are using a 4-cross pattern and 14 gauge spokes subtract another 1mm. If you are using 14-15-14 butted spokes or 15 gauge straight spokes subtract another 1mm for all lacing's except 4-cross, then subtract another 2mm. If you are using 15-16-15 butted spokes, or butted spokes with a smaller middle diameter than 16 gauge, subtract 2mm for all lacing's except 3mm for a 4-cross.
 
If you are making wheels for a wheelchair or a trailer, or any other wheel that has dish offset greater than 10mm, use the compensations for rear wheels, both drive and non drive, discussed above.
 
After calculating out the length of the spokes, you will most likely have numbers that are not round, like 265.89 or 260.03. You will need to round out the number to get a usable value. I have found that due to the nature of spoked wheels rounding the numbers out by eliminating the fractional value works best. For example, if you calculate a spoke length of 267.123, get a 267, if you calculate out a length of 261.895, get a 261.
 
Nipples and spokes have enough threads on them that spokes will work fine if they are a little too short. The only real problem with spokes being too short is that a nipple-driver screwdriver would not work to get the spokes started when you started building the wheel. The first spokes that you tightened up would work, but once you were about half way around the wheel, the screwdriver would tighten the spokes to their limit before it reaches it's spin-off point. The other problem with spokes that are a little too short is that the threads might show a little, but if you don't care about this, the wheel will work just fine and be as reliable as if the spokes were longer. Spokes that are a little too short will also allow you to finish the wheel, unlike spokes that are a little too long, so it's better to compensate a little too much than not enough.
 
If your spokes are too short and you will have to get the wheel started using only a nipple wrench, try this. About the easiest way for starting all of the spokes evenly in a case like this is to take an extra unneeded spoke (maybe an old one), cut it so it's about two inches long off the threaded end, and wrap a piece of tape around the spoke about 3mm from the end that's threaded. Make sure to use enough tape that it will stop the spoke from threading into the nipples for the whole build, 5 or 6 layers worth. Thread this spoke into the nipple from the 'inside' until the tape touches the nipple and keeps it from screwing in more. After starting a spoke, tighten the nipple to the point where the wheel's spoke touches the taped spoke, look for the nipple to start backing out as an indicator of the spokes touching. If you do this properly you will have a starting point where all of the spokes are evenly seated in their nipples around the wheel. Finish building the wheel like normal.

And

Wheel Building - http://www.troubleshooters.com/bicycles/wheelbuilding/index.htm

|

Wheel Building


If you like this wheelbuilding document, you'll love my books. See the entire list at http://www.troubleshooters.com/bookstore.

DISCLAIMER

The information in this document is information is presented "as is",  without warranty of any kind, either expressed or implied, including, but not limited to, the implied warranties of merchantability and fitness for a particular purpose. The entire risk as to the quality and performance of the information is with you. Should this information prove defective, you assume the cost of all necessary servicing, repair, correction, medical care or any other remediation.

If this is not acceptable to you, you may not read this material.

CONTENTS

A Few Core Principles of Wheel Building

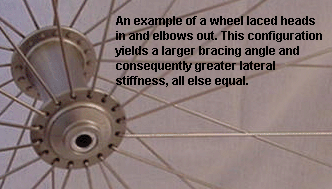
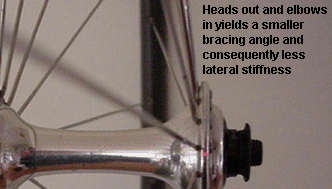
Inbound and Outbound Spokes

A hub has two flanges. Any spoke pushed through the outside of a flange to the inside is called an inbound spoke. Any spoke pushed from the inside to the outside of a flange is called an outbound spoke. See the following graphic:
Inbound and outbound spoke graphic

The concept of inbound and outbound spokes will be vital for many reasons. The most obvious is that if you insert all inbound spokes first, you'll have a much easier time lacing the wheel.

Also, many people believe that on a rear wheel, the inbound spokes should be the pulling spokes. However, if you have a hub brake in back, there's some justification for having the outbound spokes do the pulling, so that when you hit the brakes and pulling reverses, the huge tension is on the inside spokes. When you prioritize factors in lacing a wheel, I'd say that whether pulling comes from the inbound or outbound spokes is a low priority.

Sometimes in this document I call inbound spokes "inner" or "inside", and outbound spokes "outer" or "outside". You know what I mean.

However , some websites refer to inbound spokes as "trailing" or "pulling" spokes, or even "leading" or "pushing". As a concept that's just plain wrong, although perhaps on those websites the inbound spokes either always pull or always push, so in the special case of the those websites it's OK. But as a concept it's wrong, because as you'll see later, you can lace a wheel so that the inbound spokes pull or push.

Symmetric and Asymmetric Wheels

A symmetric wheel is one where the inbound spokes all go the same direction, and the outbound spokes all go the opposite direction from the inbound spokes. For instance, an inbound-pull wheel viewed from the drive (cog) side has all inbound spokes, on both flanges, going counterclockwise from hub to rim, while the outbound spokes all go clockwise to reach the rim.

An asymmetric wheel is one where the inbound spokes on one flange pull while on the other flange they push. When viewed from the drive side, the closer flange's inbound spokes go counterclockwise to the rim while the farther flange's inbound spokes go clockwise to the rim. Or vice versa. On an asymmetric wheel, the inbound spokes of one flange go the same direction as the outbound spokes of the other flange.

All other things being equal, most folks prefer symmetric wheels. They're conceptually simpler, and therefore easier to build. However, with some combinations of rim polarity (discussed later) and hub spoke hole bevel polarity (discussed later), the only way to box the wheel (discussed later) and conform to the rim polarity and conform to the hub spoke hole bevel polarity is to create an asymmetric wheel. That's a small price to pay, because violating rim polarity orhub spoke hole bevel polarity causes broken spokes and maybe wheel instability. Creating an asymmetric wheel is discussed later.

Boxing the Valve

To facilitate easy filling with air, the bike's valve must be boxed, meaning it doesn't conflict with a spoke on either side of it.

CORRECT WRONG WRONG REALLY WRONG
Correct boxing Valve conflicts with spoke to the right Valve conflicts with the spoke to its left Valve conflicts with spokes on both sides
Valve is clear of spokes on either side. Valve conflicts with spoke on its right. Valve conflicts with spoke on its left. Valve conflicts with spokes on both sides.

When you build a wheel, you must box the valve. That means planning ahead, which will be explained later.

Rim Polarity

Most rims stagger the spoke holes to alternate sides of the rim's center circumference.

Spoke hole staggering       Most rims stagger the spoke holes to alternate sides of the rim's center circumference, as shown in the graphic to the  left. The valve hole is not visible in the graphic, but instead is on the bottom side where it can't be seen.

Notice that every other hole is offset to the left of the center circumference, with alternating holes  offset to the right. It's ABSOLUTELY essential that spokes from the left hand hub flange go to left-offset rim holes, and spokes from the right hub flange go to the right-offset rim holes.

If you were to do it the other way, spokes would cross the center circumference, with each spoke entering the rim at an unacceptably shallow angle rather than the preferable 90 degrees (perpendicular).

The necessity of not crossing the center circumference constrains your wheel building possibilities. 

When the valve hole is placed, there are two possibilities: 

Left on top Right on top
Viewed top outside of rim: Left on top, vertical view from outside of rim Right on top, vertical view from outside of rim
Viewed inside of the rim with the valve hole far away from you Inner pull rim drawing Outer pull rim drawing


Viewing the , the spoke hole on the valve hole's left is higher than the one on the right. Viewing the inside of the hub with the valve hole far away from you, the spoke hole on the valve hole's right is higher than the one on the left.

Hub Spoke Hole Bevelling


Hub countersinking, straight view     Some hubs have bevelling (I'd call it countersinking, but as you'll see later the spoke heads do NOT go on the bevelled side) if you look at any side of any flange on the hub. The diagram at the left is an example.

Some hubs have holes bevelled on both sides, so that it makes no difference which side you stick the spoke in. But others have holes bevelled on one side only, with bevelling direction alternating on the flange. On the diagram to the left, the holes that don't appear bevelled are bevelled on the other side of the flange.

The purpose of the bevel is NOT to house the spoke head. Instead, the purpose is to match the curve of the spoke coming out of its head, so that the spoke is not continuously cut by a sharp right angle. When holes have bevels only one one side, ALWAYS stick spokes into the non-bevelled side.

Once again, the purpose of the bevel is NOT to house the spoke head. Instead, the purpose is to match the curve of the spoke coming out of its head, as shown in the following cutaway diagrams of spokes fitting in bevelled spoke holes:

Right Way
Wrong Way
Bevel insertion the right way     Wrong way to put the spoke through the bevel
This is the right way. The bevel supports and caresses the curve of the spoke, while the hard edge stops the spoke head from slipping through
This is the wrong way. The curve of the spoke is left to bend around the right angle and then be cut by that right angle.

NOTE

Most modern hubs are either unbevelled or bevelled the same on both sides of each hole. Such symmetrical bevelling or lack of bevelling eliminate situations where you have to choose between a boxed wheel, a symmetric wheel, or a strong and stable wheel.

Nevertheless, ALWAYS check the hub to find out about the bevelling. If bevelling is asymmetric and you lace the hub with spoke heads going into the bevel, you're going to be breaking a lot of spokes.

So to summarize, on hubs where half the holes are bevelled on one side and half on the other, always insert spokes in the non-bevelled side. Otherwise your spokes will fail early, shearing off near the head. This requirement puts yet another constraint on your lacing, requiring intricate planning.

If your hub's holes are bevelled on both sides or neither side, you have more choices, which effectively translates into the ability to build a symmetric wheel no matter what.

Hub Polarity

On a 36 spoke hub there are 18 holes on each flange. These holes DO NOT line up, but instead are staggered. the following drawing shows two hubs with bevelled holes represented by circles and non-bevelled holes represented by stars. Notice that the holes on the two flanges don't line up, but instead alternate:
Hub polarity

Notice that in the left drawing, front flange (red) bevels are a little clockwise of their back flange (yellow) counterparts. On the right drawing, the front are a little counterclockwise of the back. These are the two possible polarities of a hub with bevels, and you must account for this variable so that all your spokes are inserted from the non-bevelled to the bevelled side, rather than the other way around.

Later in this document we'll refer to front leads clockwise as "right beveled", and we'll refer to "front trails clockwise" as "right non-bevelled", and we'll make the point that right bevelled hubs are compatible with rims with the hole just right of the valve on top, while right non-bevelled hubs are compatible with rims with the hole just right of the valve on the bottom. When there's an incompatibility, either boxing, symmetry or wheel strength, durability and stability must be sacrificed. The obviousl thing to sacrifice in such cases is symmetry, and we'll show you how to do that.
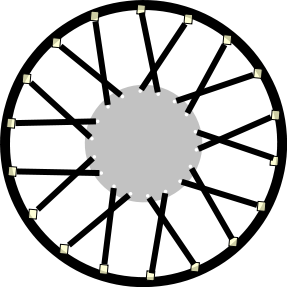
Cross Number

Wheels can be built radial (zero cross), 1 cross, 2 cross, 3 cross, 4 cross, or on 48 spoke wheels even 5 cross. As far as I'm concerned, radial spoking is a race inspired fad that saves a few grams and, makes the wheel much less robust for cornering and on the back wheel makes accelleration squishy, like an old distorted chain would do. Don't even get me started on 18 spoke wheels. When I want a good, solid wheel for transportational use, I go 3 or 4 cross. I've drawn 1, 2 and 3 cross wheels because lower cross wheels are easier to draw. For simplicity, only the spokes from the front flange are drawn, because the cross number refers to how many spokes from the same flange are crossed.


1 cross drawing
1 cross wheel. Each spoke crosses one other spoke from the same flange.
2 cross drawing
2 cross wheel. Each spoke crosses 2 spokes from the same flange. In this case, starting from the hub, one spoke is crossed almost immediately after leaving the hub, and the other is crossed about half way to the rim.
3 cross drawing     3 cross wheel. Note that the only way it could be drawn is by shrinking the hub flange and making the spokes look thinner.

Each spoke crosses three others from its flange. Starting from the hub, the first cross is right at the flange, the second is an inch or two out from the flange, and the third is about half way to the rim.

Notice that in this three cross wheel, the spokes come off the flange almost tangentially. All other things being equal, tangential flange departure is the best for transmitting power or braking with a hub brake. However, tangential departure isn't too good for supporting weight or taking bumps. It's usually best not to go completely tangential, especially given that exact tangential departure will bring a spoke very close to the head of the first spoke it crosses, creating problems.

For this reason, 3 cross is better than 4 cross for large flange hubs with 36 spokes.
4 cross wheel
This is a 4 cross wheel. I halfed the size of the hub and it still wasn't enough to keep each spoke from running closer to the center than the heads of the first spoke it crosses. In other words, it's beyond tangential, which is disfunctional. For functionality, the hub would have had to have been even smaller.

 To understand the intracicies of this wheel, click it and you'll be served up a triple-sized image.

Interlacing

We'll define interlacing shortly, but first a little review.

Spokes on non-radial wheels cross each other. On a 3 cross wheel, every inbound spoke crosses 3 outbound spokes from the same flange, and every outbound spoke crosses 3 inbound spokes from the same flange. Since all of an inbound spoke is on the inside of the hub, and all but the head of an outbound spoke is on the outside of the hub, the simplest way for spokes to cross is for the outbound spokes to cross on the outside, and inbound spokes to cross on the inside. In other words, for a given hub, when you're looking at the wheel from the outside, on the flange closest to you, the outbound spokes cross over the inbound spokes, and the inbound spokes cross under the outbound spokes.

The preceding paragraph describes a non-interlaced wheel. On an interlaced wheel, the outermost cross is in the opposite direction. In other words, on a 3 cross wheel, starting from the hub, outbound spokes cross over over under, while inbound spokes cross under under over. On a 4 cross wheel, starting from the hub, outbound spokes go over over over under, while inbound spokes go under under under over.

In summary, an interlaced wheel is a wheel where the crosses closest to the rim are the opposite polarity of the other crosses, and the opposite polarity of how the spokes come out of the flange.

In the old days, some people called interlacing "cross spoking."

Why Interlace?

Interlacing makes the wheel stiffer because that last cross forces the inbound and outbound spoke against each other. Hard. Friction between those spokes makes for less movement than there would be otherwise. To the extent that the spokes do not move against each other, the wheel becomes less like a spoked wheel and more like a solid one.

One could argue that the spoke to spoke friction consumes energy, thus making your wheels and therefore your wheel slower. Nominally, the physics is sound, but I doubt the frictional effect would be significant compared to tire friction, chain friction, and of course the big kahuna, wind resistance. I've heard that the 1970's bicycle guru Eugene Sloan recommended soldering a thin wire around each outer cross to eliminate all slippage. That would certainly eliminate the spoke friction energy loss, but I highly discourage it.

The bottom line is this: Interlacing is "settled law." It's been done at least since the late 1960's, and probably a lot longer. Every professionally laced 3 or 4 cross wheel I've ever seen is interlaced. Factory made wheels are interlaced. I argue with much "established wisdom" in the bicycle world, but even I would not build a wheel without interlacing it.

Interlace your wheels. It's easy and makes them stiffer and more stable.

Interlacing and this Document

The spoke lacing instructions in this document automatically produce interlaced wheels because they instruct you to put your outbound spokes over the first two crossed spokes and under the last one (for three cross). This interlacing discussion is included so you understand why you do this, and the importance of doing it.

Dishing

The rim should be midway between the fork ends, which is not necessarily midway between the hub flanges. When the nuts butting up against the insides of the forks are at different distances from their respective hub flanges, then to the degree possible you must offset the hub 1/2 the difference between the fork to flange distances, toward the fork that's farther from the flange. See the following out of proportion diagrams.

Drawing of dished wheel               Drawing of undished wheel
Dished Wheel
Undished Wheel

What's not shown in the preceding diagrams is that the right side of the dished hub has a gear cluster requiring the right fork end to be much farther from the right flange than the left fork end is to the left flange.

WARNING: In no situation should the rim sit directly over the flange on the dished side. That would make a weak wheel that could collapse unexpectedly, especially if making a sharp turn away from the dished side. If, looking down, you line up the top and bottom of the rim on the dished side, the flange and at least a little of the spokes should be visible. It's better to have the wheel off center in the forks than have the rim and flange form a plane. I've read elsewhere that the angle off the hub should be at least 10 degrees, but I don't personally know how good that number is.

Click here to see the math behind wheel dishing with a complete diagram.

Grease the Threads and Nipple Seat

Greasing the spoke threads, the nipple's threads inside the nipple, and the area where the nipple sits on the rim, makes it easier to turn the spoke nipples and minimizes thread friction twisting the spokes. Grease makes it a little harder to work with your hands, but over the years when you need to true your wheels, you'll thank yourself for the extra effort on building. On completion and truing of the wheel, and before installing the rimstrip, tube or tire, you should wipe off excess grease with a rag.

Assumptions Made in this Document

This document assumes you're fairly handy with bicycles and bicycle tools. Wheel building should not be your first attempt at bicycle repair. Even most experienced bicycle mechanics aren't particularly fast or good at it. Economics dictate that most of the time, the bike shop solution to a broken rim is a brand new factory assembled wheel. Even for an experienced mechanic, building a wheel takes between 3 and 20 times longer than changing a flat tire.

This document assumes you have the necessary tools -- a flathead screwdriver for quick initial spoke nipple adjustment, a decent spoke wrench of the right size, and whatever tools you need to remove a freewheel (remove it before taking the old wheel apart!). If vision is an issue, have excellent lighting and good glasses. Make yourself a good workspace consisting of at least a chair and a small table to keep tools on, unless you're using a truing stand.

Speaking of truing stands, this document assumes you're not a racer or a guy with five hundred dollar wheels. If you want the best of the best wheels, do not use the techniques in this document. As a matter of fact, for the ultimate results you'll want to have your wheels custom built by a professional wheelbuilder (which I'm most certainly not).

This document assumes you're a transportational cyclist who busts up your spokes and rims a lot, and wants to build new wheels cheaply -- possibly with rims or spokes from a garage sale wheel or even a dumpster wheel. This document assumes you don't have specialized wheel building tools like a truing stand or a dishing measurement tool -- you'll use your rear forks as a truing stand, and you'll use your eyeballs to dish your wheel.

Last, but certainly not least, this document assumes you have spokes of the proper length for your hub, rim and desired cross pattern. Perhaps you're just replacing a rim with a rim of the same diameter.

If you don't have proper length spokes, bring your hub and rim to a reliable and knowledgeable bike shop, tell them your desired cross pattern, have them sell you spokes, and have them guarantee those spokes are the right length for your hub, rim and desired cross pattern. Expect to pay at least a buck apiece for the spokes -- it's worth it if they're good, strong stainless steel spokes of the right length. The bike shop might give you two different lengths -- slightly shorter spokes for the drive side and slightly longer spokes for the non-drive side. Don't mix them up.

This document assumes you don't care about oh-so-hip or exotic spoking patterns. Not discussed here are radial spoking (bad idea, especially on rear wheels), crowsfeet spoking, leaving out half the spokes, different cross numbers for each flange, and the like.

This document assumes you're not one of those people who believe that once a wheel has been laced a little wrong or stressed in any way, the rim and spokes are damaged and must be thrown out. This document does not assume that you have a spoke tension guage, and everyone who really does regular 50 mile weeks over potholes, railroad tracks and curbs knows there's nothing wrong with a wheel that's round and straight but must have spokes at different tensions to achieve that. This document takes the position that rims and spokes are not disposable items to be thrown away the first time a wheel is bent slightly.

There are many people who would argue with the preceding paragraph. They might claim that if you have eight hundred dollar wheels built just so by a professional wheelbuilder, they'll never bend. Yeah, whatever, try that when you weigh over 200 pounds and often carry over 50 pounds of stuff in your rear baskets, jump curbs and railroad tracks, and ride on streets with cars and potholes. But anyway, if you really believe in the everlasting expensive wheel whose truing never involves making spoke tension uneven, then this is by far the wrong document for you.

If you care how many grams you save by changing your spoking pattern, this document is not for you. If you put a lot of priority on aesthetics, you might not like this document. If you're a bicycle snob espousing theories that come directly or indirectly from the racing or bike shop world, this is very much the wrong document, as all it does is tell you how to build 3 or 4 cross wheels suitable for transportational biking.

Lastly, if you're a transportational cyclist who wants to build his own wheels, either with purchased parts or scavenged parts, I wrote this document just for you!

Theory: The First Two or Three Spokes

The entire intelligence of your lacing pattern is set by the first two, or once in a while three spokes you insert. After those two or three are installed, the rest is just following patterns and goes very quickly if you have nimble hands, good eyes and a decent attention span (I have none of those three attributes and I still do fairly well). So spend extra time on the first two or three spokes. That way you won't get to the end of the wheel and have to take it apart and do it over again.

To repeat: The first two or three spokes define the entire lacing pattern of your wheel!

Be Safe, Label Your Rim

With only two spokes in your rim, it's easy to accidentally twist the hub so that things are not how you think they are. This can lead to time consuming problems. Before installing any spokes, lay your rim down flat on a table or the ground and label the top side "drive". Depending on the kind and cost of the rim, you can use marker pen, nail polish, tape or whatever. Just make sure there's an easily recognizeable mark indicating on side is the drive side.

Start by Testing for Rim Polarity/Hub Bevel Sequence Conflict

A certain combination of rim polarity and hub bevel sequencing makes it impossible to build a symmetrical wheel that is strong, boxed and symmetric. You certainly don't want to sacrifice strength, filling an unboxed wheel with air is a hassle, so you'll want to build an asymmetric wheel if you have this conbination, which I phrase as a conflict. This section tests for that combination. Let's get started:
  • Are the rim's spoke holes all in a single line, or do they alternate left and right as you go around the rim? If they are all in a single line, there's no possible conflict, so proceed to the Install the First Two or Three Spokes article and choose one of the symmetrical options.
  • Looking at the outside of each flange on the hub, do the holes appear to alternate between bevelled and non-bevelled holes? If not,there's no possible conflict, so proceed to the Install the First Two or Three Spokes article and choose one of the symmetrical options.
  • Viewing the rim horizontally from the inside as shown below, is the spoke hole just right of the valve hole on the top half or the bottom half? Write it down, right hole on bottom or right hole on top.
    Outer pull rim drawing
    Right hole on top
          Inner pull rim drawing
    Right hole on bottom
  • Viewing the hub on the drive side, with a non-bevelled hole visible on the drive flange at the 12 o'clock position, look at the non-drive flange hole visible just barely to the right (clockwise) of the non-bevelled drive flange hole. Is that non-drive flange hole to the right bevelled or not bevelled. Write it down -- right bevelled or right non-bevelled. See the following illustration to clarify this instruction:
    Hub pority, right bevelled
    Right bevelled
          Hub polarity, right non-bevelled
    Right non-bevelled
    Compatible with right
    hole on top rim.

    Compatible with right
    hole on bottom rim.

  • Now use the following matrix to find out what kind of wheel to build:

    Hub right bevelled Hub right non-bevelled
    Rim right hole on top Compatible. Build a symmetric wheel. Incompatible.  Build an asymmetric wheel.
    Rim right hole on bottom Incompatible.  Build an asymmetric wheel. Compatible. Build a symmetric wheel.
  • Armed with the preceding information, proceed to the Install the First Two or Three Spokes article and choose the proper option.

Install the First Two or Three Spokes

This section contains instructions to install first spokes for these three kinds of wheels: If you haven't done it yet, take the test in the section titled Start by Testing for Rim Polarity/Hub Sequence Conflict . If that test revealed a conflict between rim polarity and hub sequence then your only choice is Asymmetric: First Three Spokes . Otherwise, you can choose between  and , depending on whether you want your inside spokes or your outside spokes to pull. Inside-pull is preferred by most, although if the wheel has coaster brakes, disc brakes or another type of brakes attached to the hub, outside-pull offers the advantage of letting the inside spokes take the tension during braking. Bottom line, inside-pull is a good default choice, but choosing inside-pull or outside-pull is not an earth shaking decision -- an excellent wheel can be built with either. However, if you have a conflict between rim polarity and hub bevel sequencing, Asymmetric: First Three Spokes is your only choice.

Ok, let's get started. Please pick the appropriate wheel:

Symmetric Inside Pull: First Two Spokes

Your two finished spokes for an inside pull wheel will look like one of the following two illustrations, depending on whether you have a right on top or right on bottom rim:
The two spokes
First two spokes, inside pull, right spoke hole down
If rim is right hole on top.       If rim is right hole on bottom.

In the preceding illustrations, the red flange is the drive flange. Note that both spokes are inbound -- one from the drive flange and one from the non-drive flange.

In the following instructions, if the rim has all holes lined up in the center, use the right hole on top build.
  • Hold the hub drive side up.
  • Drop an inbound spoke through a non-bevelled hole in the drive side flange.
  • Holding the hub drive side up and with the rim's drive side marking up, if the hole just right of the valve (viewed from the inside of the rim) is on top, screw the spoke into that hole. Otherwise screw it into the second hole right of the valve.
  • If the spoke is screwed into the hole just to the right of the valve hole, push an inbound spoke up through the non-drive flange hole just barely to the right (clockwise) of the drive side flange hole containing a spoke. If the spoke is screwed into the second hole right of the valve hole, push a spoke up through the non-drive flange hole just barely to the left (counterclockwise) of the drive side flange hole containing a spoke. Note that in this instruction, all directions such as "right", "left", "clockwise" and "counterclockwise" are as viewed by you from above the drive flange.
  • Screw the spoke from the non-drive flange into one of the first two rim holes right of the valve hole, depending on which is vacant.
  • Compare your wheel to the illustrations preceding these directions. If your wheel matches the illustration for the proper rim polarity, and if both spokes enter through non-bevelled holes (or if both sides of all holes are bevelled), you're done.
  • Once you're done, go on to the Lace the Rest of the Spokes section.

Symmetric Outside Pull: First Two Spokes

Your two finished spokes for an outside pull wheel will look like one of the following two illustrations, depending on whether you have a right on top or right on bottom rim:
The two spokes
First two spokes, inside pull, right spoke hole down
If rim is left hole on top.       If rim is left hole on bottom.

In the preceding illustrations, the red flange is the drive flange. Note that both spokes are inbound -- one from the drive flange and one from the non-drive flange.

In the following instructions, if the rim has all holes lined up in the center, use the right hole on top build.
  • Hold the hub drive side up.
  • Drop an inbound spoke through a non-bevelled hole in the drive side flange.
  • Holding the hub drive side up and with the rim's drive side marking up, if the hole just left of the valve (viewed from the inside of the rim) is on top, screw the spoke into that hole. Otherwise screw it into the second hole left of the valve.
  • If the spoke is screwed into the hole just to the left of the valve hole, push an inbound spoke up through the non-drive flange hole just barely to the left (counterclockwise) of the drive side flange hole containing a spoke. If the spoke is screwed into the second hole left of the valve hole, push a spoke up through the non-drive flange hole just barely to the right (clockwise) of the drive side flange hole containing a spoke. Note that in this instruction, all directions such as "right", "left", "clockwise" and "counterclockwise" are as viewed by you from above the drive flange.
  • Screw the spoke from the non-drive flange into one of the first two rim holes left of the valve hole, depending on which is vacant.
  • Compare your wheel to the illustrations preceding these directions. If your wheel matches the illustration for the proper rim polarity, and if both spokes enter through non-bevelled holes (or if both sides of all holes are bevelled), you're done.
  • Once you're done, go on to the Lace the Rest of the Spokes section.

Asymmetric: First Three Spokes

Your three finished spokes for an asymmetric wheel will look like one of the following two very out of proportion illustrations, depending on whether you have a right on top or right on bottom rim:
The two spokes
First two spokes, inside pull, right spoke hole down
If rim is right hole on top.       If rim is right hole on bottom.

In the preceding illustrations, the red flange is the drive flange. Note that the red spoke and the blue spoke are inbound, but the blue and green spoke is outbound.

In the following instructions, if the rim has all holes lined up in the center, use the right hole on top build.
  • Hold the hub drive side up.
  • Drop an inbound spoke through a non-bevelled hole in the drive side flange.
  • Holding the hub drive side up and with the rim's drive side marking up, if the hole just right of the valve (viewed from the inside of the rim) is on top, screw the spoke into that hole. Otherwise screw it into the second hole right of the valve.
  • If the spoke is screwed into the hole just to the right of the valve hole, drop an  out bound spoke through the non-drive flange hole just barely to the right (clockwise) of the drive side flange hole containing a spoke. If the drive side spoke is screwed into the second hole right of the valve hole, drop an out bound spoke through the non-drive flange hole just barely to the left (counterclockwise) of the drive side flange hole containing a spoke. Note that in this instruction, all directions such as "right", "left", "clockwise" and "counterclockwise" are as viewed by you from above the drive flange.
  • Screw the spoke from the non-drive flange into one of the first two rim holes right of the valve hole, depending on which is vacant.
  • Push an inbound spoke up through the nondrive flange hole immediately counterclockwise to the nondrive flange hole already containing a spoke.
  • Prepare yourself for quite a bit of counting. I'll make it as painless as I can, but it will still be difficult. On the rim, starting from the rim hole containing the spoke outbound from the nondrive flange, count this many holes clockwise:
    Wheel Geometry
    Rim holes to go counterclockwise
    1 cross
    2
    2 cross
    6
    3 cross
    10
    4 cross   14

  • After counting, fasten the inbound nondrive flange spoke to that hole. Check that there are that number minus one rim holes between the two spokes from the nondrive flange. Be  very careful to count between nondrive spokes, rather than accidentally counting between the drive side spoke and the far nondrive spoke.
  • Understanding that a mistake on this spoke will not be detected until the wheel is almost built, resulting in lots of frustration and wasted time.
  • You're done. Go on to the Lace the Rest of the Spokes section, remembering you're building an asymmetrical wheel.

Lace the Rest of the Spokes

Congratulations! All lacing tasks requiring thought have been completed. The rest is simply following trivial patterns. Oh don't get me wrong, you still have to be careful or a careless mistake will result in an egg you must take apart and redo, but if you're careful the rest of lacing is easy. If you have good eyes and good hands, it's also going to be fast.

Also, with one small exception, the instructions in this section are one size fits all, whether you're going inside pull, outside pull, or asymmetrical. Whether your rim is right top or right bottom. Regardless of your hub's bevelling or lack thereof. When you installed the first two or three spokes, that was the majority of the thinking, and it defined the wheel's contruction.

Install Inbound from the Drive Flange

  • Holding the hub drive side up, drop the other 8 inbound spokes through the drive flange. Remember if you're using two different spoke lengths, they should be drive side spokes. They should be dropped at every second holes in the drive flange, starting with the one two holes counterclockwise of the mounted drive side spoke.
  • Be very careful that your hub hasn't twisted. Make sure the drive side of the hub is facing the same direction as the side of the rim you marked as the drive side.
  • On the hub, grab the next spoke clockwise from the mounted one, and loosely screw it in four rim holes clockwise from the mounted drive side spoke. Note there should be three holes separating the newly mounted spoke from the one mounted before.
  • Continue clockwise around the wheel, taking the spoke 2 holes clockwise on the hub from the last, and screwing it into the rim 4 holes clockwise from the last one from this side. On the rim, there should be three spoke holes separating this one from the last.
  • When all drive side inbound spokes have been installed, look over the wheel to  detect any glaring errors. Everything on the drive side should look sort of even.

This Instruction is for Asymmetric Wheels ONLY.

  • Skip this unless you're building an asymmetric wheel.
  • On the non-drive side you previously installed one inbound and one outbound spoke. At this point the outbound spoke does more harm than good.
  • Carefully find the outbound spoke from the nondrive side, unscrew it and remove it. Be very careful, because if you remove the inbound spoke you'll have quite a bit of remedial work to do, or possibly you'll have to start over.
  • Put the removed spoke and spoke nipple with your other nondrive side spokes and nipples.

Install Inbound from the Non-Drive Flange

  • Holding the wheel non-drive side up, drop the other 8 inbound spokes through the drive flange. Remember if you're using two different spoke lengths, they should be non-drive side spokes. They should be dropped at every second holes in the drive flange, starting with the one two holes counterclockwise of the mounted drive side spoke.
  • On the hub, grab the next spoke clockwise from the mounted one, and loosely screw it in four rim holes clockwise from the mounted non-drive side spoke. Note there should be three holes separating the newly mounted spoke from the one mounted before.
  • Continue clockwise around the wheel, taking the spoke 2 holes clockwise on the hub from the last, and screwing it into the rim 4 holes clockwise from the last one from this side. On the rim, there should be three spoke holes separating this one from the last.
  • When all drive side inbound spokes have been installed, look over the wheel to  detect any glaring errors. Everything should seem reasonably even, unless the hub is twisted to alter the appearance.

Install Outbound from the Drive Flange

  • Keep the wheel non-drive side up.
  • Drop all 9 outbound spokes through the drive flange, which because you're non-drive up, is the lower of the two flanges. Remember if you're using two different spoke lengths, they should be drive side spokes. If you've done everything right so far, they should consume every empty spoke hole on the drive flange, and they should alternate holes.Lightly twist the hub counterclockwise for outside-pull wheels, or clockwise for inside-pull and asymmetrical wheels.
  • Grab any of the outbound spokes. Angle it the same direction you just twisted the hub.
  • On 3 cross wheels, pass the outbound spoke over 2 inbound spokes from the same flange, and then under the third inbound spoke from the same flange. Loosely screw it in the rim 2 rim holes after the spoke you passed under. On 4 cross wheels, pass over 3, under 1, and still loosely screw it in 2 past the one you went under.
  • Grab the next outbound spoke clockwise on the hub, go over-over-under for 3 cross, or over-over-over-under for 4 cross, and loosely screw it in 2 rim holes past the spoke you went under.
  • Continue until all outbound spokes on this side are loosely screwed in.
  • When all outbound spokes on this side have been installed, look over the wheel to  detect any glaring errors. Everything should seem reasonably even and it should begin to have been formed like a real bicycle wheel.

    Install Outbound from the Non-Drive Flange

  • With drive side up, drop all 9 outbound spokes through the drive flange, which because you're non-drive up, is the lower of the two flanges. Remember if you're using two different spoke lengths, they should be drive side spokes. If you've done everything right so far, they should consume every empty spoke hole on the non-drive flange, and they should alternate holes. 
  • Grab any of the outbound spokes. Angle it the against the inbound spokes from the same flange.
  • On 3 cross wheels, pass the outbound spoke over 2 inbound spokes from the same flange, and then under the third inbound spoke from the same flange. Loosely screw it in the rim 2 rim holes after the spoke you passed under. On 4 cross wheels, pass over 3, under 1, and still loosely screw it in 2 past the one you went under.
  • Grab the next outbound spoke clockwise on the hub, go over-over-under for 3 cross, or over-over-over-under for 4 cross, and loosely screw it in 2 rim holes past the spoke you went under.
  • Continue until all outbound spokes on this side are loosely screwed in.
  • When all outbound spokes on this side have been installed, look over the wheel to  detect any glaring errors. It should look like a real bike wheel, and will even have a tiny bit of rigitity to it, although the hub can be pushed either direction or twisted a little bit.
  • Your wheel is now laced. Go on to section "To Dish or Not to Dish".

To Dish or Not to Dish

Something you need to do is consider early in truing is whether the wheel needs dishing . Dishing is where the spokes on one side (usually the drive side) are pulled tighter and shorter than on the other side. This is done because you want the rim centered between the frame forks, not between the flanges. Measure from each flange to its respective inner fork mount nut. Displace the rim 1/2 the difference between the two measurements. In other words, if the drive side's inner fork nut is 1.75 inches from the drive side flange, but the non-drive side inner fork nut is only 0.75 inches from its respective flange, then the difference is 1 inch so you'd displace the rim toward the drive side by half that 1 inch difference, for a 1/2 inch displacement.
Dish calculation diagram


Click here to see the math behind wheel dishing with a complete diagram.


If you're dishing the wheel, you'll tend to first tighten the side toward which you're displacing (usually the drive side) before tightening the other side. But all in all, it's kind of a judgement call.

My advice is the time to begin dishing dish is when only three or less spokes have loose slack in them, and some of the spokes have begun to tighten just a little bit.

When your wheel is finished, on a dished wheel, when you tap a spoke on the dished side it should make a ping sound, while on the non-dished side it should sound like pong . In no case should it sound like clunk . The dished side should be so tight that it's very hard to squeeze adjacent same-side spokes at their center. On the non-dished side, squeezing adjacent same-side spokes should make them move toward each other by maybe an eighth inch.

On a finished wheel that isn't dished, all spokes should sound somewhere between ping and pong, with no clunks, and all adjacent same-side spokes should move just slightly when squeezed at their centers.

Tightening and gross truing

Initial Tightening

  • Make sure you're working in good light and if you need glasses have the right classes cleaned for maximum clarity. You're going to need visual acuity.
  • Starting at the valve hole, go around the wheel and tighten every spoke so only a couple threads show on each spoke.
  • Starting at the valve hole, go around the wheel and tighten each spoke by exactly one turn. Repeat until most of the spoke nipples are touching the rim.

Initial Dishing

  • Starting at the valve hole, go around the wheel and tighten each dish side spoke by one revolution.
  • Repeat until the rim begins to approach where it should be on a dished wheel. Stay aware, however, at this stage the wheel has lots of side to side wobble, so when eyeballing the dish, do it at different parts of the wheel.

Intermediate tightening

  • Starting at the valve hole, go around the wheel and tighten each spoke by exactly one turn. 
  • Repeat until a few spokes are downright tight.
  • If any spoke nipples are not touching the rim, hand tighten them so they touch the rim (you did remember to grease the threads, didn't you?

Gross Truing

Here are a few tips on wheel truing:
  • Never true more than 1/8 of the wheel (45 degrees) at once.
  • Keep spinning the wheel, finding the worst part, fixing that, and repeat.
  • As a general rule, prefer to true radially before truing side to side.
  • Never adjust any spoke more than 1 turn for radial truing, or 1/2 turn for side to side truing.
  • When adjusting side to side wobble, the "worst part" is the part farthest from where the rim should be with whatever dishing it should have.
  • When gross truing a new wheel, perfer tightening to loosening until the wheel is tight enough to ride.
  • When turning a spoke, remember that part of the torque went into twisting, or "winding" the spoke. One reason you used grease on the spoke threads is to minimize spoke winding. After turning a spoke, turn it back a small amount to eliminate the winding. That amount is hardly at all with new, greased spokes, but it can be substatial on old, oxidized wheels. On spokes with a lot of winding, you'll feel how much to unwind it.
  • Every few minutes during truing, squeeze together crossing spokes from the same flange. This stresses the wheel and helps get it into a stable configuration, which means you'll have less ugly surprises later in truing or the first few days riding your new wheel.
Spin the wheel. Unless the rim was brand new and very high quality, it will wobble side to side and will be elliptical. In general you true out the elliptical distortion before the wobble. But if gross side to side makes it difficult to measure radial distortion, then get the side to side a little more under control, as explained later.

Spin the wheel and test the radius as it spins. Whereever the rim comes out too far, find the center of the part it comes out too far, making sure that point is between spokes. Tighten either 2 or 3 spokes on each side of that point by a full revolution. Spin again, do the same thing for the part of the rim extending out the most. Continue until the wheel is within 1/16 inch of true, or better. HOWEVER...

It's hard to radially true a wheel when it's swinging wildly side to side, so when the side to side motion makes it difficult to true radially, gross true side to side. Spin the wheel, and at the point where the rim deviates from the desired dish position (or center if there's no dish), tighten the spokes pulling away from the deviation. Typically the center of deviation is at a spoke, so use that as the center and tighten by 1/2 turn 2 or 3 spokes out on each side of that center point, and that spoke itself if it's from the side opposite the deviation. Repeat all this until the side to side is less than a centimeter, and then go back to radial truing.

When things are at least somewhat true both radially and side to side, verify that there's at least some tension on every spoke. If there are just one or two without tension, tighten them slightly. If there are several spokes without tension, start at the valve hole and tighten every spoke on the wheel 1/4 turn. If there are still a lot too lose do another 1/4 turn on every spoke. Be careful -- 1/4 turn on every spoke on an already tensioned wheel will make the wheel extremely tight -- 1/2 turn on every spoke would make it so tight as to be failure prone. When tightening every spoke on an already tightened wheel, never do more than 1/4 turn each without thoroughly retesting the tension.

When the wheel deviates radially less than 1/16 inch and side to side less than 1/4 inch, you're ready for fine truing.

Fine Truing

Tightening and gross truing is a wheel building activity. Fine truing is a maintenance activity. If you're heavy, aggressive or ride on rough roads you'll need to fine true your rear wheel maybe as little as every 20 miles (which would probably indicate you have the wrong wheel for your body weight and riding style). Besides being a maintenance activity, fine truing is also the final step in wheel building.

Here are some principles of fine truing:
  • Solve radial problems before addressing side to side problems.
  • Side to side is much more sensitive to spoke tensioning than is radial. For instance, if you were to tighten by one turn all spokes within 4 holes of the valve hole, and loosen by one turn the spokes opposite those on the rim, you'd get one or two millimeters of change in radial rim position. But if you tightened by one turn every drive spoke and loosened by one millimeter every non-drive side spoke, you'd move the rim somewhere around a centimeter or more toward the freewheel, depending on how much the wheel was already dished.
  • To address radial problems, turn spokes no more than 1 turn before re-checking roundness.
  • To address side to side, turn spokes no more than 1/2 turn before re-checking side to side trueness.
  • True only the worst place. Once you've addressed the worst place, spin the wheel and address the new worst place. People who try to true the entire wheel at one time end up with eggs or pretzels.
  • Your side to side trueness can be no better than your wheel wobble. Tighten your cones before truing your wheel. If you have lousy bearings and cones that must have a little slack to spin freely, loosen them again after the wheel's completely true.
  • Blips or swelling on rims make truing very difficult. Either buy new rims or use the locking pliers trick, with a frozen treat stick on the side without the blip if the blip is one-sided. Consult a bike shop to see whether it's safe to use the locking pliers trick on your particular rims.
  • Unlike gross truing and tightening, in fine truing you typically loosen some spokes and then tighten others, in order to retain the same overall tension throughout the wheel.
  • There's no such thing as perfect. Personally I can get a wheel to 1/16 inch radially, and between 1/4 and 1/16 inch side to side. Professional wheel builders can do much better, but they're still off by a few thousandths. Average people can't do as well as I can, but that's OK. If your wheel is radially true enough that you don't get annoying wheel hop, and side to side true enough that it doesn't drag on your brakes or shimmy your bike, you've done an adequate job.
  • Measure roundness on a truing stand, or by placing the wheel in the back wheel forks with the bicycle upside down, and holding a wrench close to the spinning rim.
  • Measure side to side using the caliper brakes. For close tolerances, you may need a small flashlight to see clearly.

Radial Fine Truing Procedure

  1. Hopefully with the tire off, spin the wheel to determine the center and length of the worst run that's too far out or too close in.
  2. If it's too far out, tighten from the center out to the extent of the eccentricity. Tighten spokes from both sides of the hub. Tighten each spoke no more than 1 turn. Spokes away from the center should be tightened less.
  3. If it's too close in, loosen from the center out to the extent of the eccentricity. Loosen spokes from both sides of the hub. Loosen each spoke no more than 1 turn. Spokes away from the center should be tightened less.
  4. Repeat the preceding three steps until the wheel's roundness is acceptable to you.
  5. If tightening has resulted in an overly tight wheel, or loosening has resulted in an overly loose wheel, you'll need to tighten or loosen every spoke, probably an eighth turn.

Side to Side Fine Truing Procedure

  1. Spin the wheel to determine the center and length of the worst run that's too far to one side or the other. When choosing "the worst", bear in mind where you want the rim to end up with respect to the flanges and the fork ends to achieve the desired dishing or lack thereof. In other words, consider dishing.
  2. At the worst place, first loosen the spokes on the side the rim has deviated to, and then tighten the spokes on the other side in order to pull the rim away from the deviation. How many spokes you tighten and loosen depends on the length of the deviant run. How much you tighten and loosen depends on how far to the side the rim deviates, but in no case do you turn a spoke more than 1/2 turn. Try to turn the spokes at the ends of the run less than those toward the center.
  3. Repeat the preceding two steps until the wheel's side to side trueness is acceptable to you.
  4. If the fine truing has resulted in some loose spokes, you might have to tighten every spoke on the wheel JUST SLIGHTLY, like maybe 1/8 turn. Having one or two loose spokes often indicates a broken spoke somewhere else, a frozen spoke somewhere else, or a deformed rim, so check for frozen or broken spokes. Personally, I replace broken and frozen spokes, but I just adjust the spokes to strongarm deformed rims into true -- I can't buy a new rim every time I crash or jump off a curb.

A Few Parting Thoughts

Buy or Build?

You can avoid all this. There's a guy on the Internet who will interview you, build you a wheelset of his choosing, and guarantee that wheelset for life. Lose trueness? He'll true it for you. Break a spoke? He'll replace it and true. He doesn't cover rim damage or wear, but if you dent the rim you were doing some pretty agressive riding, and if you wear out the rim, you've gotten many thousands of miles use.

So rather than cobbling together a new wheel every couple thousand miles and regularly truing and replacing spokes, for something between $300 and $900 you can have this guy build your wheels and just enjoy riding. So why am I writing this article?

Well first of all, not everyone has $300 to $900 to spend. Here in Orlando where I live, there are plenty of people using old, beat up bikes for transportation. They don't have $300, but they just might have the time to grab a few dumpster dive wheels, combine the desired hub and rim and a set of spokes that work, and maybe buy a few more spokes to complete the wheel.

Personally, I can afford $900 wheels that will give me 8 years of carefree riding. But I've also had a lot of bicycles stolen, and at least one more run over by a bus. Just because your wheels will last 8 years doesn't mean you'll be the one riding them all 8.

Then there's the wheelbuilder. After reading this guy's website I really believe he could build me 20,000 mile wheels. But I live hundreds of miles from him, so I can't avail myself of the guarantee. So who do I go to? The true wheelbuilders are hidden amongst the hordes of people basically like me, with a little more practice. I don't want to bet $300 to $900 that a guy really knows what he's doing.

Buy or Build, Part II

It's been years since I was able to buy spokes for less than a buck apiece. That's $36.00 on spokes alone if you build your own wheel. There are many great wheels you can buy prebuilt. Will they last thousands of miles? Probably not, if you're heavy or aggressive. Will they save you a lot of assembly time that you could have spent biking? Probably.

Last time I checked, you could buy a pretty decent coaster brake back wheel for fifty bucks. You couldn't build it for that price if you bought your hub, spokes and rim retail. About 1.5 years ago I bought a wheelset including a 7 speed with coaster brake rear hub for about $250. I had to replace about 20 rear spokes in the last 1.5 years and finally destroyed the rear rim, but geez, I got a great deal, and I just laced a steel rim on the back. I got a year and a half of service over more than 2000 miles.

Unless you can get spokes free or cheap or have the spokes already, or unless you want a very specific rim/hub/spoke combination, it makes more sense to buy the wheel prebuilt. Then later, when it shreds, there will be plenty of time to build it with a different rim and/or spokes.

Truing is Still an Art

If you notice, the lacing part of this document are a dead-bang, step by step procedure. Anyone who can follow instructions can do it just as well as anyone else. The truing part -- not so much.

When truing, you do part of the work by feel:
  • I think this deviation is about 8 spokes long.
  • I think the move to the left is the worst deviation right now.
  • I think this deviation can be cured by a 1/6 turn tightening on one side and loosening on the other.
  • I think this spoke has about 1/4 turn wind in it, so I'll go 1/4 turn too far and then back it out.
  • I think now's the time to switch from radial to side to side.
  • I think now's the time to switch back from side to side to radial.
  • I think the wheel's good enough right now, let's stress it and make sure it stays that way.
I can't make truing into a cookbook procedure. The best I can do is give some guidelines so even if your truing "gut feel" isn't fully developed, you'll be guided away from big mistakes, you'll eventually end up with a pretty true wheel, and you'll have a framework to learn your truing "gut feel."

Be Skeptical

With the exception of 1978-1981, I've ridden more than a thousand miles a year every year since 1968. And in every one of those years, I've heard a lot of nonsense from supposed authorities. There are the gram counters. The gruppo snobs. The "roads are smooth and it doesn't rain" halucenators. The Campagnolo fanboys who were certain the Gran Turismo derailleur was excellent, because after all, it was made by Campy. The "if it's not carbon fiber, it's not a frame" types. And worst of all, the guys believing transportational cycling is somehow less wear and tear than racing, and believe we should all go to the grocery store on modified roadbikes.

A lot of this nonsense is self-serving. Much of it originates from bike shops with limited inventories. Or bike shops who don't want their well-heeled customers intimidated by grease-covered DYIers buying a new rim to replace the one smashed jumping off a 2 foot curb into a pothole. Or riders who want to feel like something special with their $5000 bike, and can't bear to think someone can have as much fun and maybe go as fast on a dumpster special.

Be especially skeptical of the guy who says "you get what you pay for." Although sometimes that phrase is correct, all too often it's uttered as an opening gambit by the guy trying to reach into your wallet. The guy who insists that his skimpy little $80.00 aluminum rim is much stronger than a beefy steel middleweight rim you cannibalized from a dumpster bike. Who knows, maybe it is, but get some better info -- find someone who's ridden that rim 5000 miles, and see if that person is as heavy as you and as aggressive as you.

When someone tries to sell you a wheel with less than 32 spokes, be afraid. They'll tell you it's strong enough, be very afraid. The fact is, a lot of high end cyclo-cross bikes and tandems have 48 spoke wheels. The more spokes, the more strength. Yeah, I know, I know, the spokes they're selling you are super duper space age alloy, they're thicker, and the rim is a space age metal compatible with 18 spoke support. Keep your hand on your wallet. 18 spokes weigh less than a pound -- why in the world would you skimp on spokes?

Oh, and if some fool tells you to radial spoke your rear wheel, feign a coughing attack, turn around, and try not to let him hear you laugh.

You Can't Go Wrong Three Crossing

If you're running anything resembling 36 spokes, and if your hub sports flanges with a diameter between 1 inch and 3 inch, 3 cross will probably work. It might not be the very best, but it will give you a good, strong wheel that giddy-ups when you stamp on the pedal (always assuming your chain's in good shape and your frame isn't made of marshmellows). If you're running 36 spokes, always start assuming a 3 cross wheel, and then ask if other designs will give you substantial improvement without additional problems.

Money is Money

I probably spend more than $500.00 per year maintaining the family's four bicycles. Most of that money is spent at Orange Cycle Orlando, the biggest bike shop in. Here's why:

Unlike many bicycle shops, Orange Cycle understands that my thousand dollars every two years pays the rent and electricity every bit as well as the thousand dollars another customer spends on a new bike. Unlike many shops, they're not uncomfortable with the fact that I'm dressed in shorts and a Tshirt and maybe have some grease on my skin after removing some components. Unlike many other bike shops, they understand transportational cycling. I've personally witnessed two of their personnel biking to work, and from what I've overheard most of them bike to work. So when I speak of potholes and railroad tracks, they know what I'm talking about.

An Orange Cycle salesman named John gave me, over the phone, a 3 minute wheel lacing process, which I then used successfully to re-lace a wheel. This document is based in part on John's process.

Wherever you live, find a shop like Orange Cycle. Cycle Snob shops are a dime a dozen, but it's tougher to find a shop like Orange Cycle who know what they're talking about and understand that there's more to biking than racing or turkeying around the park on alternate Sundays. You know, a shop who can give you real advice and sell you what you need, and understand the kind of biking you do. Whether you build or buy, you need a shop that gets it, not yet another Cycle Snob.

Take it Slow

Wheel building is one of the most challenging tasks a bicycle mechanic does. Don't let your first wheelbuilding experience be like mine...

I bashed up a rim, so I took the wheel off my bike, went in a bike shop and bought a new rim and a spoke wrench. Then, sitting outside the bikeshop, without a minutes hesitation, I disassembled the wheel and began spoking on a new wheel. I didn't know whether the old wheel was 3 cross or 4 cross. I didn't even know such terms existed. An hour later I had an egg shaped thing with the hub way off to one side and a couple spokes that couldn't be stretched to fit. I took it apart and tried again, and it was a little better. I asked the bikeshop people for advice, and the third time I got it laced right but the truing was atrocious. About 4 hours after pulling up to the bike shop, I was on my way.

Don't do that to yourself. Before building or rebuilding a wheel that matters, practice on a dumpster wheel. Simulate hub bevels with marker pen if the hub doesn't have uneven bevels. Use these instructions to build a wheel. Then tear it down and rebuild, but this time simulating a rim of opposite polarity by spoking across the center line (drive flange spokes go to the non-drive side of the hub). Such a wheel would fail in usage, but you're just trying to learn the lacing process with all different rim/hub combinations. You don't even have to tighten them -- just get them to the point where they're recognized as successful lacing jobs.

Then to practice tightening and truing, build your practice wheel into a legitimate wheel, andBuild a wheel using these instructions. Then tighten and true, and practice again and again until you can get the wheel radially to 1/16 inch tolerances, and side to side to 1/4 to 1/8 inch tolerances.

This practice will take you several hours, but that way when you build your real wheel, possibly out of  expensive parts, you'll be much more likely to get it right.

Please Give Me Some Feedback

I'd like feedback on this document. My email address is here:

http://www.troubleshooters.com/email_steve_litt.htm

The priority is factual errors such as wrong spoking instructions. Next is feedback on how to make the document more helpful. But any kind of feedback is more than welcome.
And

Triathlon Bicycles – Do Slow Riders Save More Time? - http://triathlonbikesonline.com/triathlon-bikes/triathlon-bicycles-%E2%80%93-do-slow-riders-save-more-time/

|

Triathlon Bicycles – Do Slow Riders Save More Time?

Slow Riders improve more with Aero Equipment

Who benefits more from the use of Aerodynamic gear, a slow rider or a fast rider? For the sake of argument, let’s say that a slow rider rides a time trial at 18 mph or 30 kph and a fast rider rides at 25 mph or 40 kph.

Both riders have the same aerodymanic profile before and after implementing some aerodymamic peice of gear, let’s say, adding aerodymamic drop bars to their road bike frame. At this point, the physics of the riding can get a little complex, but the basic ideas are easy to follow.

As your speed on a bike increases, the amount of force you need to create in order to overcome the resistance provided by the air you ride against increases. With increasing speeds, come increasing forces. A faster rider spends more of her energy overcoming wind resistance than a slower rider.

The logical (but erronious) conclusion is that a faster rider would derive more benefit than a slower rider by implementing aerodymic measures such as drop bars, specialized tubing or helmet shapes, narrow arm profile, flattened back, etc.

So why, you ask, would a slower rider save more time than a faster rider with the use of aero gear?

Aha…that’s the key point is TIME savings.
Huh?

Think about it. In a race, the rider is concerned with not necessarily how fast she rides the course, but how long it takes to ride the course. Speed (miles per hour or kilometers per hour) is typically a secondary measure and is an afterthought when looking at finish line results. The overall time (hours, minutes and/or seconds) is what distinguishes first place from second plance and so forth.

I know what you’re thinking…

What in the world are you talking about Griffith?
In any given race, the bike leg is conducted over a fixed distance, say 20 k for an Sprint Distance Triathlon. The faster rider, going at 25 mph, is on the course for less time than the slower rider going at 18 mph. The first rider in this case would finish a 20K time trial in thirty minutes, whereas the slower cyclist finshes a 20k time trial in 40 minutes, a full 10 minutes later.

Now lets take both of those riders and give them some aero equiment, say switching from a standard road racing frame to a top end time trial or triathlon bike.

According to the math done by the folks at Cervelo, the speed gain by the faster cyclist is indeed more…a full 2 kph faster! And for the slower rider, the speed gain is significantly smaller, but still 1.4 kph faster. (These speed gains take into account the “speed squared” factor in calculating drag if you are doing the math at home.)

Revisit the 20k Time Trial Course
OK, now lets take these new speeds out onto our 20k Sprint Triathlon course.

The fast rider is now riding at 42 kph and the slow rider is riding at 31.4 kph…so who has a bigger time savings?

That’s right, it’s the slow gal that improves her time more…Over 20km, the fast rider finishes the bike leg in 28:34, a full 1:26 faster than her previous time. The slow rider is still slower, but finishes her leg in 38:13, a full 1:47 seconds faster!

The slower rider improved her time trial speed by 21 seconds more than the fast rider did!

If you’d like more detail about the math or figures used in this article, just stop on over to the Cervelo web site.

And

The slower you go, the more benefit there is to aero equipment

|
10-20-2010   #5
asgelle
RoadBikeReview Member

user gallery  
Join Date: Apr 2003
Posts: 2,438
Quote:
Originally Posted by Ghost234
Wait, is 20-21mph your TT speed? If it is, don't bother with spending money on wheels because you won't see any benefit. I wouldn't bother with upgrading wheels until you start breaking 40km/h (25 mp/h) consistently. Put money into an Aero helmet and/or aerobars first, skin suit second, overshoes third and then worry about wheels and TT frames.
A) The slower you go, the more benefit there is to aero equipment*, so it certainly makes sense for the 20 mph rider to invest in aero wheels.

B) Aero wheels are about equal in effectiveness to an aero frame and both are far more effective than aero helmets and skin suits (both of which show wide variations in effectiveness for different models between individuals).

* As measured by time saved. If measured by drag reduction, there is no difference with speed. If measured by power saved, the benefit increases with speed.

And

Biggest Bang For Your Buck In Time Trial Equipment - http://www.ridestrong.org.nz/RS/wikis/getting_started/biggest-bang-for-your-buck-in-time-trial-equipment.aspx

|
Biggest Bang For Your Buck In Time Trial Equipment

The speed you can achieve on your bike is determined by two factors:

1. How much power you can produce

2. Wind resistance.  The faster you go, the more wind drag you need to overcome.

A few months ago there was an excellent article in Velonews (Vol 39, No 3) about which aerodynamic equipment benefits most during an individual time trial.  What they didn't do is rank the cost vs. benefit for each piece of equipment and the associated time savings.  Years ago I saw something like this done by cyclingnews and found it extremely interesting.  Unfortunately it's buried deep in the internet and is lost forever so I thought I'd rehash it for those of you who missed it.

The following chart shows the aerodynamic savings according to what www.aerosportsresearch.com calculated for Velonews (I bascially copied the photo above and the chart chart below and added in the approximate costs for each equipment piece).

A couple notes:

- These numbers are calculated for a rider over 40kms at a time of 48minutes.  Faster than most of us could go!

- I don't understand the rational of some of their wheel comparisons and why they didn't calculate the difference between a standard rear wheel and a rear disc wheel.  I tried calculating the numbers myself but couldn't get them consistent with the numbers in the chart.  In any case, this illustrates the point of the cost-benefit analysis.

Biggest Bang For Your Buck?

1. Using aerobars that allow you to get into a tuck position will be the cheapest thing you can do for the aerodynamic benefit.  You can get a set of aerobars for $200 and they'll save you a couple minutes in a 40km TT.

2. Getting a skinsuit will provide massive benefits.   The only disclaimer here is that the testing shown here was done on a specially designed skinsuit for Nike, not a standard skinsuit.  I'm sure this skinsuit costs in excess of $1000, but you'll realize large gains with a standard skinsuit as well.    The chart above shows an extreme comparison between this Nike skinsuit and regular jersey/knicks in windtunnel testing.

3. Shoe Covers will cost you no more than $50 and could save you half a minute in 40kms.  Shoe covers smooth turbulent air over the straps and buckles of the shoes.

4. Upgrading from a regular helmet to an aero helmet could save you over a minute for a $200 spend.

5.  Time Trial Wheels are getting into the expensive end of TT equipment spectrum, but they do provide some good time savings and look very PRO.  Having an aero front wheel will make the most significant difference and will cost the least of the two.  Most of you probably already have a set of deep dish aero wheels for racing anyway.  A rear disc wheel is one of the last items you should spend lots of money on if you're looking for big savings.  However, if you want to look cool this should be the first item on your list  ;-)  A good analysis of different wheel types vs drag in different wind conditions can be found on the HED website.

And

An Overview of Material Applications in Bicycle Frames - http://www.fitwerx.com/an-overview-of-material-applications-in-bicycle-frames

|

An Overview of Material Applications in Bicycle Frames

By Ian Buchanan

Much of the bicycle industry has done a good job of creating the impression that different materials offer different ride characteristics. Aluminum is supposed to be stiff and light, but is also known for diminished durability and harsh ride quality; Titanium is supposed to be light, durable, comfortable and compliant, but a little flexible; Carbon fiber is supposed to be light and comfortable while simultaneously enhancing drivetrain stiffness; Steel (Chromoly) is supposed to be “real” and provide a comfortable and snappy ride, but is known to be a bit heavier and more flexible than other options. Right?

Not necessarily.

All manufacturers are trying to build that perfect combination of ride characteristics where stiffness and responsiveness are maximized, while the ride is still kept silky smooth and comfortable. It is not too hard to find claims of a frame being stiff, yet compliant and comfortable, with fantastic vibration damping characteristics. However, the bicycle industry has never had a good baseline testing protocol to quantify how various materials and designs actually perform in regards to specifics like stiffness and comfort. Everything has pretty much been based on “feel”, which is not a very scientific or reliable way to test a piece of machinery. Automobiles provide a good model for how unreliable “feel” can be. A BMW 745i can cruise along the Interstate at 95 mph without feeling like it is going that fast, while a compact Ford Aspire will comparatively feel like it is going pretty fast at 95 mph. Likewise, a bicycle frame that is really stiff and transmits a lot of road shock, can feel fast while a frame that feels more comfortable and compliant can feel slower. However, as the car analogy demonstrates, such feelings can be misleading. I was involved in a test that was designed to find out a little more about what the reality behind the materials and designs is. We tested the stiffness of some common frame designs and material applications in both horizontal (power transfer) and vertical (comfort and compliance) plane. Some of the test results are below:

Torsional Stiffness of the Rear Triangle:

This test applied pressure to the frame’s rear triangle side-to-side and measured how far the frame deflected in inches (moved) under a set pressure. The lower the number, the stiffer the bike is side to side, the less flex it will have, and the more direct the rider’s power will be transmitted to the drivetrain.

Rear Triangle Torsional Stiffness

Cannondale CAAD 3 Oversized Aluminum .038”
Softride Rocket R1 Aluminum .039″
Serotta Legend Ti OS: Oversized Butted Titanium down tube and chain stays .045”
Marinoni Lugged Butted Reynolds Chromoly .045”
Trek OCLV 110 Carbon .052”
Klein Quantum Pro Oversized Aluminum .054”
Seven Axiom Butted Titanium .057”
Kestrel KM40 Carbon .060”
Generic Welded Butted Chromoly Frame .066”
Litespeed Tuscany Production Titanium Frame .074”

Vertical Frame Compliance:

This test was conducted in a similar fashion to the torsional stiffness test, but it measured vertical deflection in inches. The numbers directly relate to a frame’s comfort and ability to absorb vibration. In this case, the higher the number, the more flexible, compliant and comfortable a frame’s rear triangle will be up and down.

Vertical Frame Compliance

Softride Rocket R1 Aluminum 1.4”
Litespeed Tuscany Production Titanium Frame .064”
Generic Butted Chromoly Frame .061”
Kestrel KM40 Carbon .060”
Seven Axiom Butted Titanium .057”
Serotta Legend Ti OS – Oversized Butted Titanium down tube and chain stays .054”
Marinoni Lugged Butted Reynolds Chromoly .052”
Trek OCLV 110 Carbon .052”
Klein Quantum Pro Oversized Aluminum .052”
Cannondale CAAD 3 Oversized Aluminum .049”

The results of the tests demonstrated a correlation between vertical compliance and torsional stiffness. With little variance, and the notable exception of the one suspension frame we tested (Softride Rocket R1), the frames that were stiffer torsionally were also stiffer vertically and the frames that were more compliant vertically were softer torsionally. There was also a good deal of range within materials depending upon their application in design. For example, both the Kestrel KM40 and the Trek OCLV 110 are made of carbon fiber, however the seat tubeless KM40 was softer in both the vertical and horizontal plane than the seat tube equipped Trek OCLV 110. Likewise, the Titanium Serotta Legend Ti OS, which was specifically engineered for bigger riders, was one of the stiffer frames in the test while the Titanium Litespeed Tuscany was one of the most flexible.

Over a decade ago, Holland Cycles did a similar test on a wide variety of frames and our results supported what they found: the material itself matters little in regards to torsional stiffness and vertical compliance (responsiveness and comfort). What does matter is the size, shape and wall thickness of the tubing used and the manufacturing technique (carbon lay-up, lugged or welded…) and design of the frame.

There are no bad frame materials – there are only poor applications. Any material can be built to have characteristics that are on the other end of the spectrum of what is commonly thought. Aluminum can be soft and flexible (you may remember aluminum frames made by Vitus in the ‘80’s and early ‘90’s) and Titanium and carbon can be made so stiff and harsh that they would be unrideable. So, why do materials each have their own reputations in regards to ride characteristics? Certain materials lend themselves to certain production designs and it is these initial designs that deserve the credit, or the rap, for a material’s general ride reputation, not the material itself.

When choosing a frame or new bike, do not spend time making judgments about ride quality based upon the materials used to build a frame. Instead, approach your frame decision as an individual. Only consider frame options that fit you well, and then look at the design details and tubing to find the ride characteristics that will best match your needs, body and riding style. Finally, don’t forget that a bicycle is a sum of its parts. The other components (especially the wheels and the fork) that you use effect the way it will ride as much as the frame does and should be chosen based upon how they relate to the other parts around them. If you remove yourself from the advertising claims and choose your bike through a process that considers the big picture, I can promise that you will be happy with the long-term results of your new ride.

Important Considerations for Bigger or Smaller than Average Riders (under 150lbs and over 170lbs):

Keep in mind that most production frame tubing is designed for the “average” rider – usually a male who fits on a 55cm frame and weighs around 160 lbs. As production frames become bigger or smaller than this, or a rider heavier or lighter, the ride quality of the frame is going to change too. For better or for worse, when compared to the spec size (usually about a 55cm) a smaller than average production frame is going to be stiffer and less compliant while a larger than average production frame is going to be softer and more compliant.

If you are a larger than average rider, you need to be cautious of many of the more vertically compliant (more flexible) rigid frame designs on the market. While frames like Kestrel’s KM40 or a Litespeed Tuscany might be a good option for a lighter rider, as a larger more powerful rider, you could over-flex it. This can not only prematurely fatigue the frame but can also lead to shifting and stability issues while sacrificing your power because of too much flex. Lighter riders want to be wary of stiffer frame options as they become even more stiff in smaller frame sizes and a lighter rider simply does not have the mass to flex a stiff frame the way a heavier rider does. A Cannondale with its oversized tubing might not be the best decision. Without flex, a frame will transmit a lot of road vibration and will not be very comfortable. This is one reason we often recommend custom builders like Serotta, who not only build custom geometry frames, but also custom tune the ride by offering a variety of tubing size and shape to match your specific needs and frame size.

When looking at designs, keep in mind that the ride quality a frame is known for is usually based upon the experience of an “average sized” rider. What can ride great under a 160 lbs rider, might be too mushy for a heavier rider or might be too stiff and uncomfortable for a smaller rider. If you are bigger or smaller than average cyclist, it is even more important to approach frame and component decisions based upon your individual needs so that you don’t end up with a bicycle that is too stiff or too soft for your size and power.

Copyright 2003 – Performance Specialties, Inc.


And

Bicycle Aerodynamics - http://www.fitwerx.com/bicycle-aerodynamics

|

Bicycle Aerodynamics

Bicycle Aerodynamics Energy and Power use breakdown*


% of total power consumption:

Aerodynamics Total (combination of rider aerodynamics and bike aerodynamics) – 65%

Bicycle Aerodynamics ≈15% of total power use.  (≈25% of total aerodynamics)

              Wheels – 7-11% of total aerodynamics                       

Fork – 6-9% of total aerodynamics

Frame – 4%-9% of total aerodynamics

              Other – 2-4% of total aerodynamics


The bottom line:   In a solo event or triathlon, lowering total aerodynamic drag by 10% (from 7lbs of drag to 6.3lbs), without changing  power output, will cut 21 minutes of time (7%) from a rider who averages 20mph over 100 miles.   Time will drop from 5 hours to 4 hours and 39 minutes and average speed will go up to 21.4mph.  


How to go about it:  Get properly fit and comfortable first, then concentrate on equipment choices.  If you are a time trialist or triathlete, purchase aerobars and get them fit properly immediately.   Little details, like cable routing, are inexpensive and important with aerodynamics – get these taken care of.   Put in its most basic terms, all the other variables are pretty meaningless if you are so uncomfortable that you don’t want to, or can’t, hold an aero position.   


*Comprehensive studies have not been completed to show exact importance of all variables in relation to each other.  Results are estimates from a variety of research studies within the cycling industry.

Explanation and Tech talk:


Even though the rider is about 75% of the vehicle’s aerodynamic equation, the bike is still 25%.  25% is certainly still worth paying attention to.  Bicycle and parts manufacturers spend thousands on advertising how their products minimize drag and how that can help you go faster.  I will not argue that aerodynamics is very important.  If you are riding solo, you spend about 70% of your energy overcoming its resistance.  However, manufacturers are sometimes prone to exaggeration and generalization, assuming that consumers will just take their word at face value and not think about the details involved in aerodynamics.  Aerodynamics is all about details.  Understanding the principles of aerodynamics in cycling can help you make informed product decisions based more in fact than in claims, which in the end can keep you from just buying a “me too” aero look product and helping you search out the ones that can really help.   So, let’s see if we can make what is a rather complicated subject relatively understandable while simultaneously discrediting the design of manyHollywood spaceships…

What are the important principles and terms in bicycle aerodynamics?

Aerodynamic Drag consists primarily of three aspects:  Surface Character, Frontal Surface Area andShape. 

Surface Character:   This is the texture and pattern of the surface.  For example, the hair on a tennis ball or the dimples on a golf ball.   Companies are starting to experiment more with how to use surface to improve aerodynamics, especially at lower speed.  Zipp, for example, has started adding a dimple pattern to their disk wheels.  I will not discuss surface in this article much as it currently has limited application in the cycling industry and is not as big a factor as the other two aspects.

Frontal Surface Area:   As a vehicle is propelled forward, the front profile of that vehicle is what breaks through the wind first.  Therefore, the amount of mass or surface area that hits the wind first greatly shields and effects that which is located behind it.  For this reason, minimizing frontal surface area is an excellent step towards minimizing overall drag.

Shape:  The vehicle’s overall shape drastically effects its aerodynamic efficiency.  Shape is not the same as mass, not even close.  You can have a small spherical shape and it can be far less aerodynamic than a much larger elliptical shape. This is a big reason why a football can be thrown further and with more control than a volleyball.  The shape of an object effects the proportion of skin friction to pressure drag. Skin and pressure what?  Read on…


Quick Summary:    Aerodynamic Drag = Surface Character + Frontal Surface Area + Shape.   Because of the limited use of surface character in the cycling industry, we will focus on how shape and surface work to influence the flow of air.


Total Drag explained:

Total Drag is a combination of skin friction (“good” drag) and pressure drag (“bad” drag).  The proportion of skin friction to pressure drag are directly determined by the frontal surface area and shape of the object. 


Pressure Drag is most easily defined as turbulence.  The less of it the better.  Pressure drag is the disturbed air that spins off an object when air hits it.  Pressure drag slows a vehicle down more as turbulent air is the least controlled and most random form the air can be in and acts like an out of control barrier.  Blocky or round objects will have more pressure drag than oval or elliptical objects.  Air can flow around more elliptical objects smoother where as it is more likely to bounce off turbulently around blocky or round objects.   There are specific angles that we touch on below that have been found that minimize pressure drag.

Skin Friction is actually good drag.  Skin friction is a layer of deflected air that hovers right at the surface of an object.  Think of it as a coat that adds a little bulk, but that protects the layer underneath it and thus helps it go faster.  Skin friction flows smoothly around an object.  It is good because it can create an isolation layer around an object that can keep pressure drag (“bad” drag) from forming. 

Laminar Flow:   Undisturbed, smooth air.  Air is in laminar flow before it hits an object and eventually returns to laminar flow after an object passes through it.  Laminar flow is the most efficient form the air can be in, as it is undisturbed.  The quicker that air becomes laminar after going around an object, the less drag it will have.  Skin friction drag returns to laminar flow far before Pressure drag does.


Quick Summary:  Anytime an object passes through air there is going to be drag.  However, skin friction is smooth, and consistent drag whereas pressure drag is rough and chaotic.  In the total drag equation, proportionately, the more skin friction you have and the less pressure drag you have the smoother the air will pass around the object and return to laminar flow. 


So, what are the big goals when trying to minimize drag in a cycling position or product?

A)    Create a minimal frontal surface area that minimizes the initial turbulence and disturbances on the air.  Once the air is disturbed, it is much more difficult to calm it down again.  Do your best to  leave it undisturbed.

B)    Design a shape that encourages more skin friction and less pressure drag in order to minimize total drag and allow the air to return to laminar flow as quickly as possible.

How?

Sorry, more definitions…

Aspect Ratio:  Aspect ratio is not just a term used in aerodynamics.  Aspect ratio is a proportionate relationship between length and width of an object.  If we have a 4” long object that is 1” wide, its aspect ratio is 4:1.   If it is 1” long  and 4” wide the aspect ratio is a horrid for flying 1:4.  Aspect ratio helps to explain why a football flies so well when it is thrown length wise through the air, but acts like a wounded duck when thrown height wise.  You get the point…  Aerodynamically,  NACA (the aerodynamics research predecessor to NASA) studies showed that an aerodynamic aspect ratio of around   3:1 minimized drag.   

Shape Taper/Angle:  Directly related to the  3:1 aspect ratio is the taper and angle of the object’s surface.  Aerodynamically, non-round leading edge with a 14° taper leading back from to the widest point of the tube creates an object with a good aspect ratio and an aerodynamic profile.  Only a few of the tube shapes used in bicycles have a truly aerodynamic profile and taper to them.   Most, especially in difficult to work with materials like Titanium, look aero, but are not and often compromise the structural integrity of the design more than anything.


Quick Summary:  By using proven aspect ratios and taper angles of a shape effectively, drag off an individual object can be minimized. 


4.      Mitigating Factors.   Everything would be pretty simple if it were as easy as elliptical shapes always being best.  However, there are two things that throw a real monkey wrench into the principles above. 


1)  The parts on your bicycle and body are related to each other and effect each other.  The air flow around one will effect the airflow around the other.  These different layers create what is known as boundary layers. 


2)   The bicycle and rider are dynamic objects; there are many exposed and moving parts between the bicycle and the rider that create turbulence and lead to inconsistent and uncontrolled boundary layers between them.


Boundary Layers:   Boundary layers are layers of air created in the space between objects as the object passes through the air.  Boundary layers occur between a fork leg and the wheel, or between your legs and a seat tube or post,  for example.  

Boundary layers complicate everything discussed above because they can take all that nice flowing air that is going around objects, even objects with optimal aspect ratios, and can drive it into each other, thus causing pressure drag and turbulence.  Boundary layers and the fact that riders are dynamic are why all those wind tunnel tests on individual frames, forks, wheels and even built bikes have limited meaning and application.  A dynamic rider and other parts attached to them changes everything. 


Conclusions:  Do the mitigating factors mean everything we talked about above is meaningless?   No.  The concepts are all valid and valuable to understand because they allow you to look at the big picture and to take all the advertising about frame and wheel aerodynamics with a grain of salt.  Aerodynamics is not something that is simple or to be taken at face value – nor is it even something that even the most knowledgeable aerodynamicists claim to have full control over in regards to dynamic and low speed objects like bicycles.  There is just too much going on at one time and too many individually dependent variables for that to be allowed.   You can’t just build a bike of aero shaped tubes to go fast, the rest of the package needs to be aero in relation to it for it to help you out.   Some good rules to buy by:


1)     Cycling is a big picture sport.  Don’t buy a bike or a product just because it is aero on its own.  Buy it because it fits you well, rides well, is built well and meets all your needs as a cyclist. 

2)     Between you and your bike, you are by far the bigger air disturbance of the two.   The vast majority of the total aerodynamics equation is you, the rider.  Working on your riding position to make it aerodynamically efficient is the number one thing you can do to reduce aerodynamic drag and allows all the other technology to work better.


And

TECH INFO – AERODYNAMIC RESULTS

|
<18 mph>


<20 mph>


<25 mph>


<28 mph>

And

Crank Length – Does Size Really Matter? - http://pezcyclingnews.com/?pg=fullstory&id=8845

|
Crank Length – Does Size Really Matter?
Tuesday, November 16, 2010  6:18:45 AM PT

by Dr. Stephen Cheung, Ph.D.

  Greater power and big wattage is what we’re all seeking on the bike with training. One way to achieve that is strictly through improving our biomechanical connection to the bike through a better bike fit. And with cycling being all about pedaling, one avenue may be through optimizing our crank length. What is the state of our knowledge concerning optimal crank length? Does size really matter?

Embrace the Off-Season
It’s mid-November and the off-season is now here in for most riders in the Northern Hemisphere, and that’s soon to be the case even for the hard-core cyclocross crowd in North America. One of the main goals of the off-season is to give our bodies and minds a well-deserved break from the rigours of hard training.

For myself, the final cyclocross race in southern Ontario runs December 5. Therefore, my intention is to take pretty much all of December off the bike to give myself a true break that I’ve never really given myself since taking August 2007 off for a family trip to Slovenia. Instead, I’ll spend that time on the squash courts and doing some core and stability training.

At the same time, the other big part of the off-season for top pros is testing out new equipment or bike positions. This really is the ideal and arguably the only time such major changes should even be attempted. In the midst of the season with heavy training, the risk of switching out something as seemingly innocuous as a different saddle, shoe, or a lower/longer stem can tip the body over the threshold of stress, leading to tendonitis or other overuse injuries.

For those of us without big lavish sponsors, the general rule of saving major equipment changes for the winter time still holds true, and there’s at least the Christmas gift season and a lot of subtle and not-so-subtle hinting!

Crank Call
What are some things to test out during the off-season? With the all-consuming importance of an optimal pedal stroke to cycling, one thing to explore may be optimal crank length. This has, for a large part, been the topic in bike fit and biomechanics that has been rife with myths and black art. Folk lore suggests that crank length has a huge effect on the power that you can generate, or the cadence that you’re able to ride at.

Namely, the general view is that shorter cranks allow you to spin and accelerate quicker but at the cost of high torque or power. Theoretically, this is a boon to sprinters and crit riders. In contrast, longer cranks take more time to turn over and force a lower pedaling rate, but are able to produce higher torques. This should favour time trialists and climbers. At the same time, a number of equations and rules of thumb exists relating either overall height, inseam, or leg length to ideal crank lengths. Is there indeed an optimal crank length for power output, and how well do these prediction equations actually hold up?

Martin et al. 2001
Such a question, for me, obviously leads to finding relevant scientific data. One of the influential studies over this past decade was performed by Jim Martin at the University of Utah (2). The goal of this study was not to look at time trial performance or aerobic capacity, but rather purely maximal power output and the effects of crank length. Several interesting features of this study included:

• Rather than play around with “typical” commercial crank lengths, this study really went to extremes. Namely, five crank lengths were tested. Besides the “standard” 170 mm, the cranks were 120, 145, 195, and 220 mm! This may sound completely irrelevant to “real” cycling, but that’s not really the point. The aim rather was to see whether real extremes would make a difference at all before looking at “fine” changes of 2.5 mm here or there. After all, if big changes do not make a difference, then why should minor ones?

• Seat position was standardized to each subject’s normal saddle height, and was set so that the saddle top to pedal axle (at its most extended) were the same regardless of crank length.

• The goal was not to explore things like VO2max or time trial performance, but rather maximal explosive power output. This was accomplished using a previously validated protocol consisting of a very short acceleration and sprint lasting 5 seconds or less (3).

• Importantly, previous studies that have examined similar ideas have not adjusted the gear ratios. This creates a situation where the pedal resistance is different across the different crank lengths. In turn, this confounds the experimental design because more force is actually required because of the difference in leverage. What Martin et al. do in this study is to adjust the gear ratios on the ergometer so that the pedal resistance were similar across crank lengths. In other words, longer cranks got bigger gears, and smaller cranks got proportionally smaller gears.

• Subjects were 16 trained male cyclists. The week prior to testing, they were familiarized with the different cranks. No further details of what this entailed were provided, and it’s obvious that they were not adapted to the different lengths. However, this might play a much bigger role with longer, more aerobic efforts than maximal power.

• Each testing day involved 5 min of warmup at 100 W, followed by four maximal sprints.

Cranking Out the Data
In this study, the “optimal” pedaling rate and pedaling speeds were defined as that which gave the highest power. Therefore, not surprisingly, the pedaling rate was inversely related to crank length. In other words, the longer the cranks, the lower the optimal cadence at which maximal power was achieved.

Also not surprisingly, pedal speed was progressively higher with greater crank length. Most of us may think that this sounds crazy, because shorter cranks should spin faster, This isn’t as counter-intuitive as it may appear, however, if you recall that the gearing was different to achieve a similar pedal resistance, and also that the larger cranks meant that the pedal travelled a much greater distance with each revolution.

Of course, the main variable of interest here was maximal power output, and the results are rather surprising. Despite the subjects not really being adapted to the different crank lengths except possibly the 170 mm, the maximal power outputs were only minimally affected. The range was less than 4%, from 1149 W for the 220 mm, to 1194 W for the 145 mm. Overall, the 145 and 170 mm cranks were slightly but statistically greater for maximal power output than the 120 and 220 mm cranks.

Even if you’re a really finicky type, it would be reasonable then to toss out the 120 and 220 mm cranks as clearly being less beneficial. However, this still leaves a huge range between 145 – 195 mm cranks, spanning far beyond what is commercially available for cyclists, where no real difference in maximal power output.

So How Do I Size My Cranks
The other interesting data emerging from Martin et al. (2) is calculating ideal crank lengths for their different subjects. In the end, overall leg length and tibia length formed the best predictors for optimal crank length for the subjects, at 20% and 41% of these two measures, respectively (e.g. optimal crank length = 0.2 * (overall leg length)). This resulted in a range of optimal crank lengths from 151-183 mm for the subjects. However, it is important to note that the “standard” 170 mm cranks produced, at most, an average of 0.5% lower maximal power output. Therefore, it can be argued that crank length does not really matter when it comes to maximal power generation.

So What Cranks Do I Use Then?
It sounds like we’ve just been beating a dead horse, right? Not so fast! The ultimate result from this study is that crank length doesn’t seem to matter, but what it really means is that we can be free to experiment with different crank lengths for different applications! For example, this may indeed mean that we can swap around different crank lengths between a criterium and a time trial. Alternately, mountain bikers and cyclocross riders might not need to aim for longer cranks as a default, but may experiment with shorter cranks for greater cornering or log clearance.

Another application is to really get a handle on your optimal or preferred cadence, and then adopt a crank length that facilitates your riding within that preferred cadence. For example, I know from many years of riding and training diaries that I tend to be a lower cadence type of rider. Therefore, I might err towards a longer crank length that will naturally have me spinning at a lower cadence, whereas a short crank might force me to become biomechanically non-economical in a high cadence.

Macdermid 2010 Study
There is, of course, a severe caveat that I must emphasize again. This study only looked at maximal power output and NOT anything to do with aerobic performance that might be relevant to the vast majority of cycling. Therefore, while logistically really difficult because of the need for people to be trained and adapted to different crank lengths, the more appropriate study would be replicating this design with more time trial type of tests.

This leads to an interesting Kiwi-Aussie 2010 study that looked at more “realistic” crank lengths and endurance exercise, with the specific context and population of female cross-country mountain bikers (1). In brief, cranks of 170, 172.5, and 175 mm were tested with maximal sprint, a VO2max test, and also an isokinetic (constant velocity) test at 50 rpm. The latter is certainly representative of grinding up a big climb off-road. No differences in the isokinetic or VO2max tests were observed across the three crank lengths. What was really interesting, however, was that, while peak power was not different, the time required to achieve peak power was much lower with the 170 mm (2.57 s) than the 175 mm (3.29 s) cranks.

This has significant practical applications. The shorter cranks permitted you to generate high power outputs faster. This ability is critical in closing a gap, accelerating in a sprint, and also laying out that massive and quick burst of power to get you over an obstacle on the trail or out of a turn in cyclocross.

Test Yourself
Therefore, the best thing to do appears to be a matter of testing and understanding your inherent style and the demands of your sport. One great way to do it is to give yourself time to try out different bike positions and crank lengths during the off-season or the “easy” base period of training. There are several systems available for altering crank lengths on the fly, with likely the simplest and most adjustable system that from PowerCranks. The “basic” PowerCranks model can be adjustable from 145-182.5 mm, and the “long adjustable” version can be adjusted all the way from 85-220 mm crank lengths. PowerCranks can either be purchased for your own bike or for variety of indoor training ergometers, making it possible for you to test your own preferred or optimal crank length under different conditions. The important thing is to give yourself time (at least a few easy rides) to adapt to each different crank length before doing any specific testing like a 5 min effort.

Let me know your comments and experiences with different crank lengths!

Have fun and ride safe!

References
1. Macdermid PW and Edwards AM. Influence of crank length on cycle ergometry performance of well-trained female cross-country mountain bike athletes. Eur.J.Appl.Physiol. 108: 1: 177-182, 2010.
2. Martin JC and Spirduso WW. Determinants of maximal cycling power: crank length, pedaling rate and pedal speed. Eur.J.Appl.Physiol. 84: 5: 413-418, 2001.
3. Martin JC, Wagner BM and Coyle EF. Inertial-load method determines maximal cycling power in a single exercise bout. Med.Sci.Sports Exerc. 29: 11: 1505-1512, 1997.


And

Wheel Drag result

|

And

Wheel Stiffness Test (DRAFT) - http://www.sheldonbrown.com/rinard/wheel/index.htm

|

Damon Rinard's
Wheel Stiffness Test (DRAFT)


Data table: data.htm

This test continues as wheels are loaned. I would like to measure Rolfs, Spinergy Spox, LEWs and any Mavic pre-built wheel like Heliums, Classics, Elites or Cosmics. Please let me know if you would consider shipping your wheels to me for testing: drinard@yahoo.com


What is wheel lateral stiffness?

Lateral stiffness is how well a wheel resists flexing laterally (sideways) when a given load is applied in that direction. Stiffness is the ability to resist flex. A stiff wheel flexes very little. Mathematically stiffness is the inverse of flexibility. It must be emphasized that wheel stiffness is not wheel strength, and in fact may be unrelated to it. I am measuring stiffness, not strength. 


Wheel Coordinate System

X is the forward direction of travel when the rider rides the bike. Y is to the side; this is the direction of the load I applied and the deflections I measured. Z is elevation.

You can see in this photo that the rider's weight on the left pedal causes a reaction force at the ground contact point with a component in the lateral or Y axis direction. This is the deflection I am measuring.   

Why measure stiffness?

How important is wheel stiffness? There are plenty of parameters besides wheel stiffness that have a much larger bearing on bicycle performance, such as aerodynamics and training. However, recently there has been debate about the lateral stiffness of bicycle wheels. The increasing popularity of Rolf wheels and the recent introduction of Shimano wheels has made people wonder whether low spoke count wheels can be stiff enough laterally.

Howard Sutherland is quoted as saying "One measurement is worth 50 expert opinions", and so I decided to measure the lateral stiffness of as many wheels as I could get my hands on. While I was at it, I decided it might also be easy to answer some more academic questions about wheel stiffness in general. Measuring the lateral stiffness of all these wheels has two purposes, as I see it:

  1. To rank the wheels according to their lateral stiffness.
  2. To answer some general theoretical questions about how wheels flex.

Fixture

In order to measure the lateral stiffness of a bicycle wheel, I had to

  1. Hold the wheel rigidly,
  2. Apply a known load,
  3. Measure the deflection.

A milling machine's table makes a very rigid base, so I machined aluminum blocks to hold the hub axle in the vice and quill of the mill (see Figure 1). I turned the blocks from an aluminum bar and bent a hook from a three-foot length of 5/16 inch diameter steel rod. I used the lathe and mill at San Diego State University's student projects lab. 


Aluminum blocks receive axle.

Wheel is rigidly held with axle vertical.

Machined aluminum blocks with through hole to receive axle. Using these blocks I mounted the wheel between the bed and quill of a milling machine.

Method of holding wheel and measuring deflection at the rim. Hooked end of weight will be hung next to the dial indicator.

Procedure

  1. Assign a wheel number, weigh, photograph and record description of wheel.
  2. Measure deflection several times in several places and record data. If bearing play is present, gently push rim to take up the slack before measuring deflection.
  3. Ship wheel back to the owner.
  4. Add data to this page.

Loading the Wheel and Measuring Deflection

The load is 25.78 pounds (11.7 kilograms or 115 Newtons). There is no magic significance to the 25.78 pound load, but it has some advantages over larger or smaller loads:

  • It is large enough to avoid some of the difficulty of measuring smaller deflections at lower loads.
  • It is small enough not to damage any wheels.
  • I have a convenient 25 pound weight that hangs nicely from a 0.78 pound rod ;-).

The load is applied at the center of the rim's brake track, normal to the plane of the wheel. Deflection is measured at a spot within 3/8 of an inch (10 mm) of the point of load application, which I consider to be essentially at the point of load application. This 25.78 pound load did no damage to any wheel. Every wheel was perfectly rideable after testing.

A 25.78 pound lateral load is almost certainly more than road bike wheels see in normal use. I chose 25.78 pounds because the deflection at a lower, more realistic load may be small enough that my measurement error of +/-0.002" (0.05mm) might become an inconveniently large fraction of the measured deflection.


Questions

I hope to measure enough wheels of different configurations to answer the following theoretical questions:

1. Does stiffness vary with spoke tension?

Some believe that a wheel built with tighter spokes is stiffer. It is not. Wheel stiffness does not vary significantly with spoke tension unless a spoke becomes totally slack. 

I measured the deflection of Wheel #2 while gradually loosening the spokes in quarter turn increments. The wheel did not display any significant change in stiffness until the spokes were so loose some became totally slack. 

If the spokes are so loose that some become slack, the wheel becomes much more flexible. The last two data points below, 9 and 10, taken when the spokes were so loose the wheel was almost sloppy, show that the wheel becomes significantly more flexible when spokes on the detensioning side of the wheel actually become slack. That is expected: a slack spoke cannot add stiffness to the wheel; it buckles easily in compression. 

A wheel whose spokes become slack while riding is a weak wheel, because slack spokes cannot support the rim. This can be avoided to a large extent by building wheels with tighter spokes. If spokes are tighter initially, then the sudden increase in flexibility shown in data points 9 and 10 is less likely to occur in use because a tighter wheel can bear a higher load before spokes become slack.

Deflection, inches, for 25.78lb.

Wheel #2, MA2 32 spoke front.

No. quarter      Deflection
turns looser    10/19  11/12
============    =====  =====
    1           0.075  0.070
    2           0.071  0.069
    3           0.070  0.068
    4           0.070  0.067
    5           0.069  0.067
    6           0.068  0.067
    7           0.068  0.067
    8           0.069  0.068
    9           0.079  0.085
   10           0.130  0.157

2. Are front wheels stiffer than similar rear wheels, and if so by how much?

Most front wheels are stiffer than similar rear wheels. Structurally this is because front hub flanges are typically wider than rear hub flanges. Rear hub flange spacing is constrained by industry standard dimensions, such as cassette width, drop out spacing and symmetrical frames. 

Most rear wheels I tested are between 40 and 60% more flexible than similar front wheels. Although it may be the case that stiffer front wheels have been developed intentionally for more stable handling, it is possible that many front wheels are simply overbuilt or many rear wheels are underbuilt. 

Track wheels are an exception: rear hub flanges are often much wider than fronts, and therefore such wheels are slightly stiffer laterally than similar front wheels. Compare track wheels number 83 and 84 (below) for an example.

Besides flange spacing, the other parameters that could affect stiffness are often held constant between front and rear wheel pairs: number and gauge of spokes, and rim cross section. However, it is becoming more common to see wheel pairs sold with a different number of spokes in the front and rear wheels. On the other hand it is still the rare wheel pair that is sold with different rims front and rear.

Some pairs whose front and rear wheels are closer to the same stiffness are:

  • Specialized Composite wheels. Since these wheels are the same except for hub guts, they do not differ significantly between front and rear wheels. In fact the front can be used as a rear by changing the axle.
  • Velomax Javelin. The rear wheel is slightly stiffer than the front wheel (8%). Structurally this may be because of two design features: the narrow front hub flange spacing decreases the bracing angle on this wheel compared to more typical front hubs with wider spacing, and the higher spoke count in the rear wheel compared to the front (24 spokes in the rear versus 18 in the front) adds stiffness to the rear wheel to more nearly match the front.
  • Spinergy Rev-X. The RevXs I measured showed a large range of deflections from the four spots around the wheel: +/- 0.010" to 0.016" out of about 0.150", (0.25mm to 0.41mm out of about 3.81mm) or 11%. For this pair of Spinergies (wheels 56 and 57), the front is about 12% to 16% more flexible than the rear. There is no dimensional explanation for this (flange spacing and other dimensions are the same), so I attribute the difference to variation in manufacturing from wheel to wheel. The next pair might have the front/rear relationship reversed.
  • Aerospoke. Like the Specialized, these wheels are the same except for hub guts. Consequently, they do not differ significantly between front and rear wheels.

3. Do dished wheels flex differently from one side to the other?

Dished wheels do not flex significantly differently to the left or right. 

A dished wheel might deflect slightly more due to loads applied from the flatter side than it does due to equivalent loads applied from the other, but it is unclear from this data whether this is really the case. It may be true in theory, because of the difference in bracing angle between the right side spokes and the left side spokes: the more favorable bracing angle of the left side spokes may be better able to restrain the rim against deflection to the right than the right side spokes might brace the rim against deflection to the left.

If it exists, the difference is very small: on the order of just a few thousandths of an inch, i.e. within the error of my measurement, even under the larger-than-life load of 25.78 pounds that I used for this test. Even if a small difference exists in this artificially high load case, no one will notice the even smaller difference the wheel might display while riding.

In the chart above, the length of the vertical lines represent the range of deflections obtained from loading the wheel and measuring deflection at four or more random locations around the wheel. There are two vertical lines for each wheel: 

  1. Range of deflections due to loads applied from the left hand side (indicated by the LH after the wheel name) and
  2. Range of deflections due to loads applied from the right hand side (indicated by the RH after the wheel name).

The average of all four (or more) measurements is near the middle of each vertical range line. The slanted line between each range connects the average deflection of the left and right sides. The fact that this line is slanted upward toward the right in every case shows that, on average, rear wheels may flex more in response to loads from the right side than to loads from the left. However, the range of measurements (length of vertical lines) shows that the difference between left and right is often smaller than the measurement error or the range of response of one side of the wheel.


4. How does the shape of the wheel change in response to a lateral load?

This question comes up because some people worry about the rim rubbing the brakes while climbing. There is no doubt rims rub sometimes on MTBs, because occasionally you can hear the brake shoes rub. But the wheel is not the only thing flexing: frames and forks flex, too.

In describing how the rim flexes at points far away from the point of load application, Jobst Brandt describes a saddle or taco shape [1]. I measured and found this to be accurate. Let the the point of load application be called 0 degrees. Then the two other locations I measured would be called 90 degrees away and 180 degrees away, i.e., one quarter and one half way around the wheel away from the point of load application. To form a saddle shape, when a load is applied at 0 degrees in the positive direction, the deflection at +/-90 degrees should be in the negative direction, and the deflection at 180 degrees should begin to return in a relatively more positive direction again. This is exactly what happened.

The chart below shows the (exaggerated) shape of several rims when loaded as described above. The zero-deflection base line is horizontal, and the various colored plots of the different wheels show the lateral deflections measured at 0, 90 and 180 degrees.

The load is applied at 0 degrees, at the left end of the horizontal axis. The deflections measured at 0, 90 and 180 degrees show the wheels assume the expected arching or saddle shape. At 180 degrees, even though the rim is headed in the positive direction, it does not often cross back over to the positive side of the zero-deflection base line.

Between 90 and 180 degrees is where most bikes have their rim brakes. The deflection here is fairly consistent among all the wheels, and did not vary significantly between the stiffer and more flexible wheels. 

For this 25 pound load all wheels flexed about 0.020 inches or half a millimeter in this region. This flex is in the direction opposite the load. This is the same direction the frame is likely to flex under a lateral load at the tire contact patch, such as occurs when climbing out of the saddle or sprinting. That means the brake and wheel will move in the same direction, thus reducing the relative motion between the rim and brake that may cause the brake to rub.


5. Do paired spokes change lateral stiffness? (Rolf, Shimano) 

Some wheels pair the spokes together at the rim, so there are large spans of unsupported rim between spoke pairs. Does this make the wheel flex differently? The usual worry is that the rim will be more flexible in the long unsupported span. 

I compared deflection measured when the wheel was loaded at pairs of spokes to deflection measured when the wheel was loaded between pairs of spokes. So far I have measured five wheels built with some kind of paired spoking. There is no significant difference in the flexibility of these wheels anywhere around the rim, either at spoke pairs or between them.


Wheel Increase in flexibility between spokes
Rolf Vector 20 spoke front 1.5%
Rolf Vector 24 spoke rear 1.2%
Rigida 12 spoke front 4.2%
Shimano WH7700 front -1.2%
Shimano WH7700 rear -0.7%

The results are mixed, but generally paired spoking for any given wire spoked wheel does not lead to a significant increase in flexibility between the spoke pairs compared to flexibility at the spoke pairs. Such wheels are about the same stiffness at spoke pairs as they are between spoke pairs. In fact the Shimano wheels are actually slightly stiffer between spokes than they are at spokes, but again this difference is insignificant.

In contrast, the muti-spoke composite wheels showed a marked difference in stiffness between spokes compared to the stiffness when loaded at the spokes, with a few exceptions.  

Wheel Increase in flexibility between spokes Comments
Zipp 3000 135% Largest difference in this test.
Specialized front 700c clincher 57% Taller rim and wider spokes make an improvement in this design.
Specialized rear 700c clincher 59%  
Specialized rear 650c clincher 56%  
Specialized rear 700c clincher 57%  
Spinergy RevX, new style 49% Four spoke pairs shorten the length of unsupported rim.
Corima 4 spoke 23% Four wide spokes shorten the length of unsupported rim even more.
Aerospoke 5 spoke 0% These wheels are the most flexible wheels I've ever tested. There is no difference at or between spokes primarily because they are so flexible everywhere.
Spinergy RevX, old style -17% Yes, these wheels are actually stiffer between spokes. But this is only because the spokes are so loose that the bottom side spoke becomes slack at a very low load. When loaded between spokes, the rim is stiff enough to recruit two pairs of spokes and make the underside spokes go slack on both pairs. The wheel is stiffer in this case because slackening comes at a higher load.

For example, the Specialized wheel is over 50% more flexible when the load is between spokes than when the load is at a spoke. In spite of this large difference, many people ride Specialized Composite wheels with great success, although there have been reports of disconcerting handling when they are used in track sprinting or all-round riding on steeper tracks.


6. Do Shimano's laterally crossed spokes make the wheel laterally stiff?


In a word, no. 

The Shimano WH7700 (Dura-Ace) wheels have a number of fairly unusual features, one of which is a spoking arrangement in which the spokes originating at one side of the hub attach to the rim on the other side. 

Shimano claims "...the wheel's lateral rigidity is significantly increased...", and maybe it is compared to a similarly light 16 spoke wheel without the lateral crossover. But it's still a pretty flexible wheel. The most similar wheels in this test are the Mavic Cosmics. Even though the Cosmics are heavier, they serve as a fairly good comparison since, like the Shimanos, the Cosmics have a fairly deep rim and 16 spokes. The significant differences between the Cosmics and the Shimanos are wider hub flanges and a slightly larger rim cross section on the Cosmic, both of which add stiffness as well as weight.


more details
Shimano WH-7700 16 spoke front. 2.6 x 1.4 mm elliptical spokes. Thanks to Hi-Tech Bikes. 739 g 18.8 x 29.6 mm 2.11mm

more details
Shimano WH-7700 16 spoke rear. 2.6 x 1.4 mm elliptical spokes. Thanks to Hi-Tech Bikes. 963 g 18.8 x 29.6 mm 3.81mm from RH

3.78mm from LH


big picture
Mavic Cosmic 16 spoke tubular front. 2.8 x 1.4 mm elliptical spokes. Thanks to Darryl Mataya. 917 g 18.3 x 37.7 mm 1.70mm

big picture
Mavic Cosmic 16 spoke tubular rear. 2.8 x 1.4 mm elliptical spokes. Thanks to Darryl Mataya. 1097 g 18.3 x 37.7 mm 2.46mm from RH

2.36 from LH


7. How does spoke gauge affect stiffness?

Thicker spokes make a wheel stiffer, if all else is equal.  A typical 32 spoke wheel built with 2.0mm spokes is about 11% stiffer than a similar wheel built with 2.0-1.45mm swaged spokes.

Compare the deflection of two wheels: numbers 39 and 47. Wheel 39 is built with 2.0-1.45mm swaged spokes, but wheel 47 is built with 2.0mm straight gauge spokes. Hub dimensions are effectively identical, spoke count is the same and the rims are the same make and model, so the only structural difference is the spoke gauge.

Result? The wheel with thinner spokes deflected 0.051" (1.30mm) in font and 0.067"1.70mm) in the rear, but the wheel with thicker spokes deflected less: only 0.046" (1.17mm) and 0.055" (1.40mm) for front and rear, respectively. That's an 11% increase in stiffness for the thicker spoked wheels.

Interestingly, wheel stiffness depends on more than just spoke thickness; the rim and other factors also contribute, so only part of the increase in raw spoke stiffness shows up in measured wheel stiffness. The thicker spoke by itself is nearly twice as stiff axially as the thinner spoke!


8. Does having a tire inflated matter?

This is really a theoretical question, because no one rides without inflated tires. But I measured a few wheels with tires inflated and compared them to the deflection when completely deflated. An inflated tire increases stiffness by about 5 to 8% compared to a wheel with the tire deflated. But this effect is negligible compared to the effects of tire inflation pressure on other variables. Don't choose higer pressures to get stiffer wheels! Choose tire pressure for other reasons (comfort, traction, avoiding pinch flats and rim damage, rolling resistance, etc.)


9. Does stiffness vary with spoke cross?

I need more wheels to measure the effect of spoke pattern. If you have a wheel similar to one that's already listed, but with different pattern, please send it to me. E-mail Damon Rinard.


10. Are radial wheels stiffer elbows in or out? How much?

Because the bracing angle is increased, radial wheels are about 13% stiffer elbows out, all else equal.

Todd Kuzma sent me a wheel built elbows in, and after measuring lateral stiffness I rebuilt it elbows out. The wheel's deflection was 0.050" (1.27mm) with elbows in and 0.044" (1.12mm) with elbows out, for a difference of 0.006" (0.15mm) more flexible in the elbows in configuration, all else equal.

Wheel #95 is an example of a wheel built with spoke elbows out.
Wheel #5 is an example of a wheel built with spoke elbows in.

In the table of results, the two wheels I compared are #94 with elbows in, and #95 with elbows out.


11. Is there an optimum left flange location?

For highest lateral stiffenss, wider flanges are always better. Front hubs already have nearly the widest flange spacing that will fit in the fork, but rear hubs have room to widen flange spacing by moving the left flange outboard. But as always there is a tradeoff. The farther the flange moves, the looser the spokes. Loose spokes make for a weaker wheel.


12. How do 650c wheels compare to 700c?

Smaller wheels are stiffer than larger wheels. If they are built on the same hubs, then the bracing angle is larger for smaller rims. If everything else is the same, 650c wheels are about 25% stiffer than 700c wheels. 

Note: smaller wheels often have fewer spokes than larger wheels, and this is as it should be. For similar strength, spoke spacing at the rim is what should be held constant, not spoke count. Consequently, a 650c wheel with 28 spokes is about the same strength as a 700c wheel with 32. This is the case with the wheels I measured to get this 25% difference in stiffness: wheels 69 and 71.


13. Are newer Spinergy RevXs stiffer than the old ones?

Yes, the newer Spinergy I measured (Serial 315036) was stiffer: it showed only a third as much deflection under the test load as the older model (Serials 107760 and 107875). The two older RevXs I measured were among the most flexible wheels (0.119" to 0.160" deflection(3.02mm to 4.06mm)), but the newer RevX of the same size is the stiffest wheel I've ever measured (only about 0.050" (1.27mm) of deflection). Why? Because the older Spinergies' bottom side spokes became slack under the test load. In contrast, the newer Spinergy's spokes did not go slack. Slack spokes cannot contribute to wheel stiffness; thus the older model deflected more.

While spoke tension normally does not have a significant effect on wheel stiffness (See question number 1 above), this is only the case as long as no spokes become slack. That is one reason high initial spoke tension is important. In comparing old versus new Spinergies, the initial tension was low enough in the older Spinergies that spokes did become slack, making the older wheels more flexible as a result.


14. Is the Spinergy RevX SuperStiff stiffer than a regular Spinergy RevX ?

Yes, the SuperStiff I measured deflected only 3/4 as much as the regular model (0.046" (1.17mm) for the Super Stiff compared to 0.059" (1.50mm) for the regular model). The Super Stiff is about 25% stiffer than a regular RevX. Both of these are quite new (Serial 301526 for the regular RevX and 357185 for the SuperStiff).


15. Do Spinergy X-Beams make a measurable difference?

Nope. The difference is smaller than the precision of the measurement. Strangely enough, the RevX I measured was actually more flexible after I installed the X-Beams, though the difference is insignificant (0.059" or 1.50mm of deflection with the X-Beams compared to 0.057" or 1.45mm without).


16. How does rim weight affect stiffness?

For rims of similar design, the heavier rim makes a wheel stiffer.


Is deflection linear with load?


How does lateral tire flex compare?


Does tying and soldering affect stiffness?


Relative contribution of the following to stiffness:

  • number of spokes
  • spoke gauge
  • rim weight
  • hub flange spacing
  • rim height

Conclusions (to be added later)

Data table: data.htm. Compare these results with Fran�ois Grignon's research. Does wheel stiffness even matter?

What the test does and does not do:

This test measures lateral stiffness alone. It does not include the radial load all wheels see in use. It does not measure radial stiffness, nor strength of any kind.

Is it possible for wheels to be too stiff?

Never! How could infinite lateral stiffness be bad?

Is it possible for wheels to be too too flexible?

Maybe. Control issues? Contribute to speed wobble?

References

1. Brandt, Jobst, The Bicycle Wheel, Avocet Press, Palo Alto, California, 1995.

2. Brandt, Jobst, "Tied and Soldered Wheels", rec.bicycles.* newsgroup FAQ.

4. Grignon, Fran�ois, Aero Wheels Under Scrutiny, Club Cycliste Beaconsfield Cycling Club, 1998.

3. Smith, Jeff, Re: Spoke tension and stiffness?, rec.bicycles.tech newsgroup message, November 07, 1999.


Thanks to... 

Rob Bernhard, Jobst Brandt, Vic Copeland, Fran�ois Grignon, Todd Holland, Eric Hollenbeck, Brad Hunter, Jon Isaacs, Todd Kuzma, Darryl Mataya, Barney Milner, Hank Montrose, Chuck Davis, Dan Rock, Charles O'Toole, Jane Rinard, Ken Robb, Russell Seaton and Shaun Wallace.


Home back to Damon Rinard's Bicycle Tech Page

Copyright � 1999-2001 Damon Rinard

Harris Cyclery Navigational Hub Page

Articles by Sheldon Brown and others
Harris
Home
Beginners Brakes Commuting
Lights
Cycle-
Computers
Do-It-
Yourself
Essays
Family
Cycling
Fixed Gear
Singlespeed
Frames Gears &
Drivetrain
Bicycle
Humor
Bicycle
Glossary
Bicycle
Links
Old
Bikes
Repair
Tips
Tandems Touring What's
New
Wheels Sheldon
Brown


And

TWP Critical Power Calculator - http://www.trainwithpower.co.uk/TestYourself/CriticalTest/tabid/388/language/en-US/Default.aspx

|
             
Training Zones Determination   TWP_Chemise.bmp
     
Critical Power test (20 min)    
     
Power :      
     
     
Intensity Zone Power Accomplishment Perception
LOW 1 - Low Endurance No pain.
Fatigue after 3-4 h
2 - Basic Endurance No pain
Easy to speak
MEDIUM 3 - Tempo First muscular pain
Difficulty to carry out a long conversation
4 - Road Race Progressive increase of muscular pain
Difficulty to carry out a conversation
HIGH 5 - Speed training above threshold Fast increase of muscular pain
Impossible to carry out a conversation
6 - VO2 max training
Anaerobic sprint
Impossible to speak
Exhaustion after effort + overbreathing

http://www.trainwithpower.co.uk/TestYourself/CriticalTest/tabid/388/language/en-US/Default.aspx
And

10 Weight Loss Tips From Pro Cyclists - http://www.active.com/cycling/Articles/10-Weight-Loss-Tips-From-Pro-Cyclists.htm?cmp=276&memberid=96954122&lyrisid=20900594

|

10 Weight Loss Tips From Pro Cyclists

Cyclist
  • Share
  • Email
  • Print
  • Save

Pro cyclists might get their bike clothes for free and have VO2-max ceilings the rest of us can only dream about, but many of them are like us in one surprising way: If they don't watch what they eat, they gain weight fast. We asked 10 racers how they stripped the fat--from 10 to 80 pounds--from their bodies and transformed themselves into lean machines. Their tips are refreshingly simple and undeniably effective.

I LOST 55 POUNDS
The Racer: Dan Schmatz
The Body: 5-foot-10, 160 lb.
The Team: BMC
The Secret: "Exercise early, abstain late."

Schmatz's hard-core routine isn't for the faint of heart: He doesn't eat after 7 p.m., and he often does a 30- to 60-minute run, ride or hike before breakfast. Some studies show that low-intensity exercise before breakfast helps the body burn more fat than usual. Schmatz cautions that if you try this, don't cancel the benefit by pigging out: "A lot of people don't realize that a breakfast of a gourmet coffee drink and a bagel can pack 1,000 calories," he says.

I LOST 10 POUNDS
The Racer: Jeremy Horgan-Kobelski
The Body: 6-foot-1, 150 lb.
The Team: Subaru-Gary Fisher
The Secret: "Eat dinner like a pauper."

The winner of four consecutive national mountain bike championships, Horgan-Kobelski says, "The single biggest thing that has helped me lose weight has been eating a light dinner. Even after a huge day of training, if I fueled properly throughout and after the ride, I can usually get away with eating just some salad or steamed or grilled vegetables with a small amount of lean protein."

I LOST 10 POUNDS
The Racer: Betina Hold
The Body: 5-foot-6, 125 lb.
The Team: Cheerwine
The Secret: "Chew more."

When she was desperate to lose weight to transform herself from muscled-up competitive rower to lean cyclist, Hold stumbled onto one of the simplest ways to lose weight. Studies have shown that simply chewing your food longer--as many as 100 times per bite, in some research--results in reduced caloric intake. Hold also began chewing gum at the first craving for food. She says it gives her time to decide, "Am I really hungry or am I bored, nervous or stressed? I find in many cases, I just chew some gum and I don't really need food."

I LOST 80 POUNDS
The Racer: Jack Seehafer
The Body: 5-foot-6, 145 lb.
The Team: Einstein's cycling
The Secret: "The simplest way: Ride more, eat less--and drink less beer."

Seehafer packed on 100 pounds during seven years of inactivity when he stopped cycling after high school. After he started riding again, the weight came off, which motivated him to cut calories from his diet. This can be as simple as using smaller plates at home, always leaving several bites on your plate, or waiting 15 minutes before deciding whether to go back for seconds. When Seehafer met lean pro Kori Kelly, whom he eventually married, he adopted her eating habits and chiseled away more weight. Today, he keeps the pounds off with vigilance: "As soon as I notice that I've gained a couple pounds, I immediately adjust what I'm eating and increase my exercise," he says.


I LOST 40 POUNDS
The Racer: Devora Peterson
The Body: 5-foot-1, 118 lb.
The Team: Tokyo Joe's/Golite
The Secret: "Seek professional help."

Peterson says that paying a dietitian to analyze her intake and recommend changes was worth the money because there's less for her to think about. After you submit a detailed, multiday food record to your dietitian, you will receive a meal plan customized to your needs, specifying how many servings of foods you should eat from each food group. Some plans chart out each meal, and explain basic information such as what size a serving is. Says Peterson, "It keeps me honest."

I LOST 16 POUNDS
The Racer: Brooke O'Connor
The Body: 5-foot-8, 142 lb.
The Team: Hub Racing
The Secret: "Drink water."

O'Connor lost weight when, she says, "I started drinking water, not caloric beverages." Now pregnant (and starting to show), she's less focused on being lean.
 
I LOST 60 POUNDS
The Racer: Mike Jones
The Body: 6-foot-2, 175 lb.
The Team: jelly belly
The Secret: "Ride base miles to blast fat."

Jones says that when he was at his heaviest, he used his bike mainly as "transportation to and from pizza shops, burger joints and bars." One winter in Upstate New York, he began logging lots of slow, steady miles on his bike (out of boredom) and noticed the pounds burning off. "The more base miles you can put in, the better," he says. "Not only does it prepare your aerobic engine for higher-intensity work, but also the sheer volume of exercise means you burn tons of calories." Once he had some momentum, Jones increased the rate of weight loss by downsizing his portions and cutting "empty" liquid calories such as beer and soda.

I LOST 20 POUNDS
The Racer: Tom Danielson
The Body: 5-foot-10, 130 lb.
The Team: Discovery
The Secret: "Burn more than you eat."

Danielson was never overweight, but to compete at the highest level of the sport, he needed to dramatically increase his power-to-weight ratio, a feat he could achieve only by losing pounds. Danielson monitors how many calories he burns while riding (with an SRM power meter), then adjusts his caloric intake to make sure he eats 200 to 300 fewer calories per day than he burns. "The weight loss is slow and gradual, no more than two pounds per week," he says. One important point: "Don't diet on the bike." Restricting calories during a ride can make you feel weak--and destroy motivation.
 
I LOST 22 POUNDS
The Racer: Tomarra C. Muhlfeld
The Body: 5-foot-3, 116 lb.
The Team: Trek/VW
The Secret: "Eat at home."

Studies have shown that people who eat out the most also weigh more than normal--a stat Muhlfeld proved to herself. When she stopped eating out most nights, she began losing weight. "When you eat at home you're in control," she says. "You know exactly what you're eating, the portions and how it's prepared. When you eat out, there are so many hidden calories, even when you try to order healthy choices."

I LOST 12 POUNDS
The Racer: Christine Vardaros
The Body: 5-foot-8, 122 lb.
The Team: pruneaux d'Agen
The Secret: "All veggie, all the time."

When Vardaros decided to do something good for the environment, she didn't expect her philanthropy to pay off so personally. "I switched from being a vegetarian to being a vegan, and the weight just dropped off," she says. You don't have to follow a strict regimen to see some improvement, according to researchers at Johns Hopkins University who say that going meatless just one day per week can result in weight loss--a plan they call Meatless Monday (meatlessmonday.com). One other surprisingly simple and effective tip from Vardaros: Keep bread in the freezer so you have to think about, and sometimes pass on, preparing that PB&J sandwich.


And

Warm-up Routines - http://www.flammerouge.je/content/3_factsheets/constant/warmup.htm

|

Warm-up Routines

This factsheet is all about warming up.  If you want to race hard from the gun, then you need a good warm-up.  If you want to race harder for longer, then you need a good warm-up.  If you want to survive the first hill, attack, or prolonged effort, you need a good warm-up.  If you don't normally get in the groove until the middle of the race, then... you get the message.  If you want to race better you need to warm-up better, that dear readers is a fact, not an opinion. 

Why warm-up?
For most of us a winter of intense, military-precision-like preparation precludes each season.  It's a sad fact, and a terrible waste, that very few of us prepare for individual events with the same gusto and attention to detail. 

Your body is a complex machine of muscles, fibres, tissue, bones and juices.  Just like any other highly complex, well-tuned machine it works better when it's warm; and warming it is a fine art and one to which you should pay attention. 

Ever watched a Moto GP or Formula 1 race?  Each pilot has their own individual preparation routines (I could go into neuro-linguistic programming (NLP) but that would take a web site in itself, maybe some other day).  Valentino Rossi crouches into a ball, and holds the right toe peg of the bike before he gets on and goes down the pit lane clearing obstructions! 

Each professional sports person has a routine that can be anything from putting their left sock on before the right or having their favourite motivational tune on their i-pod, while sipping their specially mixed carb-drink.  Everything is planned to happen, nothing is left to chance.  

In F1, the warm-up isn't just an opportunity for the drivers to wave to their adoring public.  Drivers leave the line like a scalded cat, to warm the tyres.  They move the car violently from side to side, to warm the suspension.  They go up and down the gears, to test shift response and warm the oil.  They accelerate and brake as hard as possible, to put energy into the vehicle to generate heat.

While doing all this, they mentally attune themselves to their surroundings, the environment and those around them.  When the race starts they are as ready as they could ever be both physically and mentally.  So, what's this got to do with cycling?

Absolutely bloody everything.  A thorough warm up is vital to you hitting your event fully prepared.  You need to have a heart that's ready to pump blood, muscles and joints ready to accept it, and a nervous system that's synchronised to co-ordinate muscle and reflex responses in the correct order and proportion.  You also need to prime your stomach and digestion system to start the glucose drip that you'll need for your race.  What's more you need to get your brain in to gear.  Especially if it's a time trial.

Cold, Warm, Hot.  Bad, Good, Bad
You can have too much of a good thing.  Riding at 80% of VO2max for 30 minutes will get all of the above physiological responses working but it would be a terrible warm up.  Turning up in your car, placing the front wheel in the bike then doing a 25 mile TT while you're "fresh" is also a terrible warm up.  Hot and cold are bad, only warm is good; everything in moderation!

Each event is different.  Paradoxically the longer the event the shorter the warm up.  You might take an hour to do a proper warm up for a ten lap crit at the track, yet you might just rub a bit of sports balm on your legs for a 125 mile cyclosportive.  Just as each event is different, so is each individual.  What is a spot on warm-up for one cyclist could see another's legs full of lactic and a heart rate bouncing off max.

Work out what is good for you,  Use the first few events of the year to hone your warm up technique.  Don't just ride out to the race with your mates then do a few ups and downs of the start and finish straight to arrive on the line panting.  That's not a warm up, that's better than nothing but little short of a waste.  So if that isn't a warm up, what is?

A Five Stage Warm-up Suggestion
As we've said, everyone's different but the same laws of physics and physiology apply to us all.  So do road conditions.  During your warm-up check for road irregularities, damp patches under trees and in braking areas.  Watch out for oil on the road and farm entrances for "farming-stuff".  Ask yourself, "Will those people working in the fields be leaving during our race?"  If the horse droppings that weren't there on the last lap have just appeared, where's the horse?  There are hundreds of clues to help you if you allow yourself to see them.

Anyway, to the riding.  First you need to give your body a good introduction to the efforts to come.  That introduction starts with stage one, at least twenty minutes at winter club run pace on the small ring. 

Once your heart rate and body temperature has stabilized and you don't feel the cold any more, intensity can increase to stage two.  Slip it on the big ring and give it a minute or two at the same speed as stage one.  Then, slowwwly increase the speed and gears to finish at the end of five minutes at a good tempo pace.  Then it's back on to the small ring to let your body settle down and recover its composure.

Stage three calls for a one minute wind up.  Not of your mates but a wind up to cruising speed.  Take two minutes to recover then go again for another minute.  By now your heart should be in race running mode and you should be breathing rhythmically and have a slight sweat on.  You shouldn't be gasping for breath with your heart coming through your chest and you shouldn't have any conscious feeling of heavy legs.

Stage four is dependent on the event you're about to undertake. 

Time trials obviously require a different approach than road races and criteriums.  For a time trial, you need to ride at your threshold for the duration of the event. So a TT warm up requires a steadily increasing intensity 10 minute ride, building up to lactate threshold in the last minute.  For a 10 mile TT you might consider two of these.

Road races require different physiological responses from your body.  Although road races normally start easier than a TT when the hammer goes down you need to be ready.   You may need to climb a hill, chase a break or launch an attack at an early stage in the proceedings.  

So, try three or four sprints of around eight seconds just to get the muscles firing in the right order and to clear the soot from your lungs.  Take a good three minutes recovery between each effort, if there is a hill try an 80% interval on the first part, just to see what happens!

Criteriums!  Anything can, and usually does, happen on the first lap of a crit.  There's always someone in the 53x12 while the rest of the race is trying to get their foot in the pedals.  They'll probably come back, but they may not.  Whatever happens you need to be ready because if there is a split your race could be over before the end of the first lap.

Try the TT threshold warm up, but obviously your gears will be lower and your cadence (leg speed) higher.  After a four of five minute recovery build up to a tempo pace then give it a ten second sprint.  Take a few minutes recovery then do a twenty second, chasing a break effort.  After a few more minutes recovery try a thirty second, launching an attack effort.  There, all race efforts simulated, tested and passed. 

Stage five is the same for all events.  Take three to five minutes to recover after your last effort.  Return to the start and take a last minute swig of your carb drink and, if needed, take a gel or a little food.  Remove your non-race clothing and put it somewhere dry, have a final check of tyre pressures, check your pockets for food (in or out depending on the event), check your race bottles, make sure your number is on and in the right place, your helmet is done up correctly, your shoes are set and then clear your mind of all distractions.  You've done everything you can to prepare yourself. 

Arrive on the line, in the correct gear for starting (very important and often overlooked), composed, warmed and ready to go.  Listen to the last minute advice from the organiser and think through what you are going to do in the early stages of the event.  A perfect warm-up is worth nothing if you're sitting at the back when the break goes!  When the start comes position yourself near the front and whatever happens; enjoy your race! 

The Message
The quality of your race is dependent on three factors; your preparation (physical and nutritional), your mental attitude and your pre-event warm-up.  If any one of those factors is not 100% spot on, your performance is compromised.  You might still win, because someone else is even less prepared, but your individual performance will not be at its full potential.

Like everything else in this website, not all of it will work for you.  Take the bits that do work and ignore the bits that don't.  You're not going to win every race you enter so choose the less important ones and PLAN a warm-up routine to try.  Use the stages above as a starting point.  If they work great, if not modify them.  Whatever you do, don't just turn up and make it up on the day.

Stages one to three can be done on the way to the event.  After you've signed on and done your number, get back on the bike and do stages four and five.  Or do one and two, then get your number; the permutations are endless!  Don't start your warm-up, get your number then get chatting and forget the final stages.  Because when the race starts the effects will at best be minimised and at the worst, lost.

The ultimate message is: plan a routine, try it then modify it until it suits your style.  Use non-important races to test and modify the plan.  DON'T try a new routine on your most important race of the year.  It's been done and it doesn't work.  Good Luck.


And

Time Trial Strategies - http://www.flammerouge.je/content/3_factsheets/constant/ttstrat.htm

|

Time Trial Strategies

Rider Man Stage I 
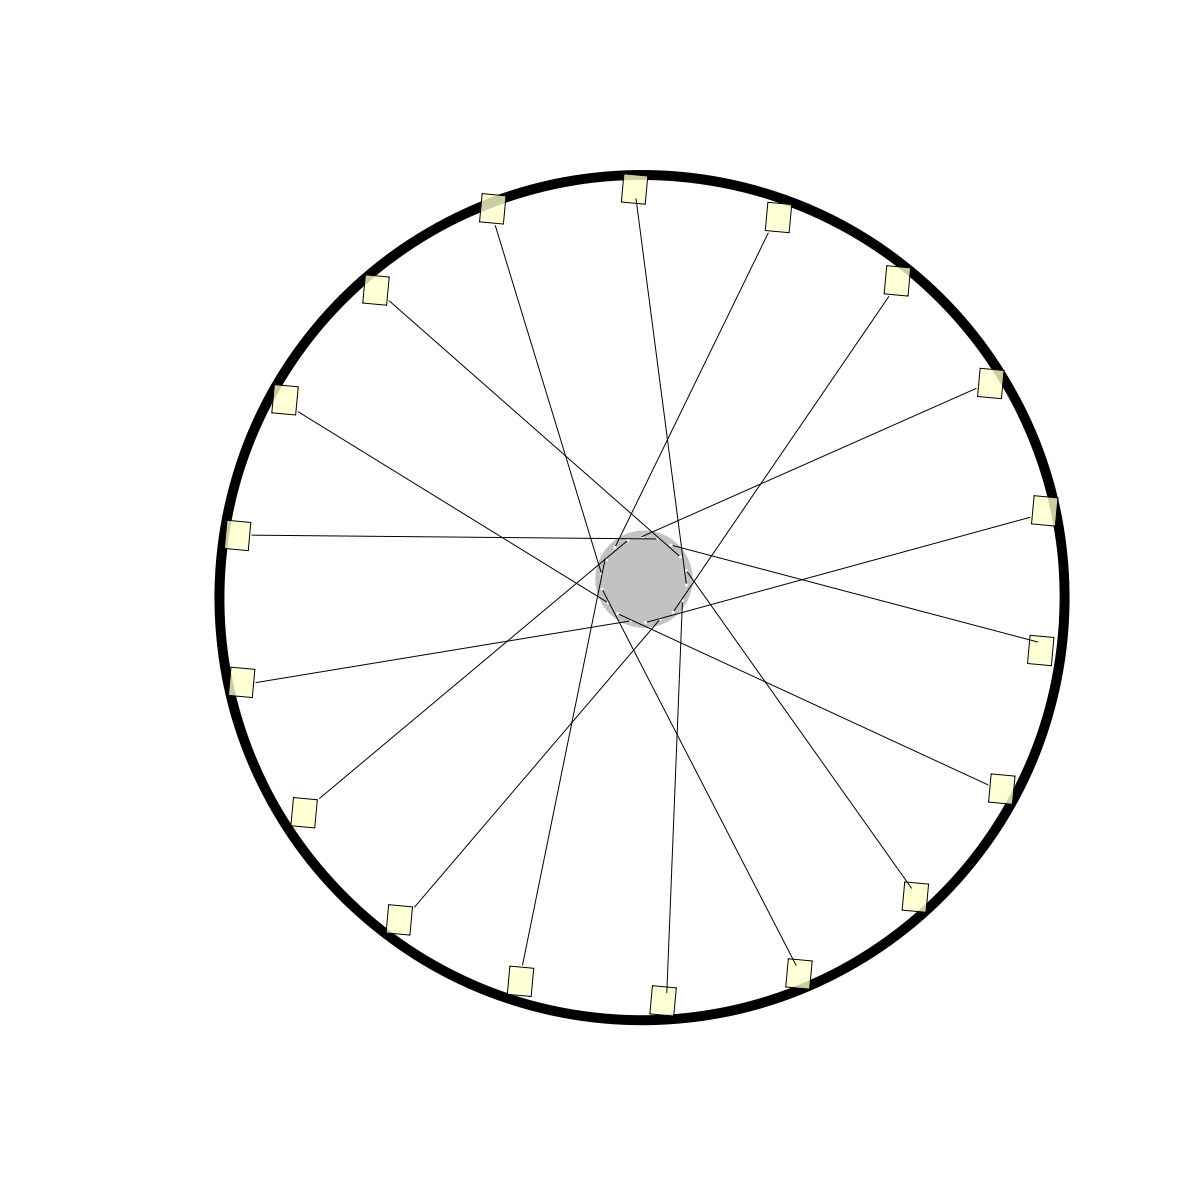
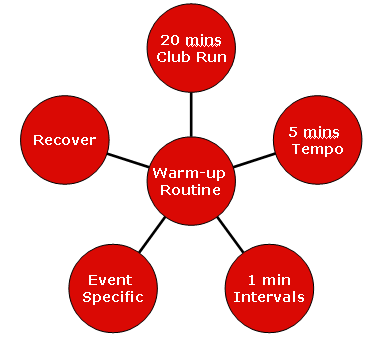
Before we get into the details of time trial strategies, I'll assume that you've prepared well through the winter, eaten the right things in the right amounts, have taken sufficient pre-event rest and have planned a proper warm-up routine

If you haven't, feel free to check out the other factsheets in this section of the website. 

To realise your potential in a time trial, let alone get a personal best or a win, you need to have a plan and a fancy word for a plan is a strategy.  So in this factsheet will discuss just that.

For clients that have done MAP Ramp or wVO2max tests, you'll know exactly what you are capable of.  For those that haven't, this could be a step into the unknown.  But don't let that put you off; there's still a lot to play for.

A typical time trial
If you want to see how a typical cyclist approaches a typical time trial all you have to do is stand in an appropriate place on a typical course.  About two miles in is the best place because on an out and back course you get a better perspective of what's happening.  At one mile in, the results may be a little skewed, I'll explain why later.

Three, two, one, go!  BANG, 53x14 and a two hundred yard sprint to get up to speed.  Slump back into the saddle, legs filling with lactate, and it's straight into crisis management as reality and oxygen debt begin to take hold.  A mile in and you're already thinking "should I change down?"  

 Figure 2. Results of subject AC's first ten miles test

The above diagram shows how a typical cyclist approaches a typical time trial.  The rider being tested was asked to complete a simulated ten mile time trial as fast as they could.  Being a typical cyclist, this was their response.  In the first mile, our cyclist got up to a high speed very quickly then, very quickly, began to pay the price.  They either overestimated their abilities or underestimated the task; either way the result was the same.  A lesson learned. 

We can see our test rider averaged 230 watts for the whole ride, effectively this is their 10 mile TT threshold.  However, their initial peak resulted in the first mile and a half being ridden at 40 watts above their overall average.  This caused the following two and a half miles to be ridden at 50 watts below average! 

So at the four mile point, they were far more under average in both time and watts than they were over it!  You can see from the blue line that this pattern was repeated for the rest of the ride.  There is little to suggest that the pattern would not be repeated to a greater extent in a 25 mile time trial.

So the exam question for this section is; "Would their overall average power output, and obviously speed, have been higher if they had not gone over their threshold in the first section of the ride?"  Why not reflect on one of your recent time trials and ask yourself the same question.

A strategic time trial
In a subsequent retest, just a week later, our rider was coached in the virtues of using a formulated pacing strategy.  They were paced using the average power output of their first ride and asked to stay close to this for the first ten minutes.  They were then allowed to gently ramp up their performance to levels at which they were comfortably stretched!  We now get to see a completely different outcome.

 Figure 4. Subject AC's second time miles test

You don't need a power meter to see this ride was undertaken with far less stress than the first.  You can see how heart rate peaked later, a mile and a half in rather than three quarters of a mile.  This obviously created less lactic stress, no oxygen debt and allowed the rider to develop a smooth powerful rhythm.  A rhythm sustainable to the end of the ride. 

You will also see the average power for the second test was 10 watts higher than the first.  This has nothing to do with the rider being fitter or stronger, it was purely down to better management of the physiological resources available. 

A measured ride, staying within limits at all times.  Actually that last sentence isn't true.  With a mile to go you give it everything you've got.  Ignore averages, heart rates and aching legs.  You should cross the line with nothing in the tank.

The Scores on the Doors
The black line below shows the benchmark of the first ride.  The red line represents the second test and shows where the rider was, in time, in relation to the first. 

So at a mile in, our rider was four seconds down, at a mile and a half, six seconds down.  At three miles they've closed the gap and we now see the effects of our pacing strategy begin to pay off. 

 Figure 5. Ride 1 v ride 2 for subject AC

In the last seven miles a gap of 85 seconds opens up.  That's 12 seconds a mile!  How good is that?  Bloody good is the answer, and it was all for free!  No sweat, no intervals, no extra training, it's there within all of us.  Maybe not to the same extent but I bet we could all go at least 30 seconds quicker if we controlled our emotions and instincts and just applied a little bit of science to our riding.


The Message
Okay, the above all seems pretty clear but I'll sum it up in one sentence.  Exceeding threshold power then recovering, is not conducive to optimum time trial performance.  This really is an undisputable fact not an opinion.  If you don't want to experiment in a real live event, come and try a test in the lab.  

If someone could guarantee you could go quicker in a ten mile time trial without supplementation, training or spending a fortune on aero stuff wouldn't you take notice? 

Why not fight all of your natural instincts to go like a bullet from a gun and give this strategy thingy a go?  If you do you will, without doubt, be rewarded. 

It would be a shame if a lack of a strategy stopped you making full use of all your hard training and even more frustrating if you didn't realise your true potential for the day.  So, good luck in your next time trial, and remember less is more. 

Why not give it a go; what's the worst that could happen?

Why watch at two miles in?
Standing one mile in to a time trial course gives a false impression because on the way out most people are still hanging on to their initial speed.  On the way back they're winding it up for a big finish.  So you get a skewed impression of their overall performance. 

Standing at one mile most riders appear to be going better than they actually are.  At the two mile marker you get a more measured reflection of true performance (and suffering!).

How we did it in the old days...

Guernsey Easter Festival 1987

Acknowledgement
I would like to thank Senior Coach Malcolm Firth for the use of the graphics supporting this factsheet.


And

Functional Threshold Power - http://www.flammerouge.je/content/3_factsheets/constant/functhresh.htm

|

Functional Threshold Power

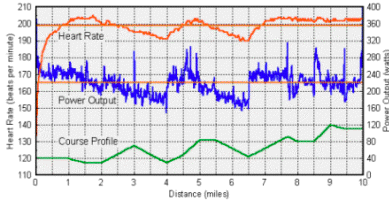
Now we're in to the big scary world of smoke and mirrors!  Whether you know it or not, Functional Threshold Power (FTP) is one of the key factors of your cycling armoury.  But don't worry if you don't know what it is or why it should be important to you, you're not alone. 
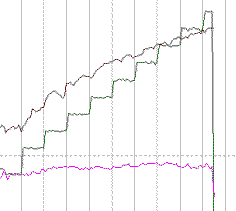
Functional Threshold Power is a phrase that has as many perceived meanings as there are gears on a bike.  In this article we'll try to explain, what it is, why you should be interested in it and how you can go about understanding, measuring and improving it, to enable you to be a fitter, faster, stronger cyclist.

Before we start, a reality check.  Whole books have been written on this subject, so we're not going to cover every nuance, or better still overcomplicate things, in a simple, one page article. I'll try to make this factsheet deep enough to portray a meaningful representation of the subject but not that deep as we end up drowning in science and psycho-babble.  So here goes...

The General Consensus
It's generally agreed that your Functional Threshold Power is the maximal power output you can sustain for the duration of one hour.  It's NOT your "average" power.  As average has a different meaning in a power context to "sustained".

There are many ways to compute, extrapolate or test for Functional Threshold Power and Dr Andrew Coggan seems to be the man with a plan when it comes to this area of cycling science.  So who am I to contradict.  Most of this article will be a reflection of the work of himself and others, with punditry and anecdotal insight from myself!

Your Starter for Ten...
Calculating your FTP is quite straightforward.  If you've got power meter analysis software (WKO+ see sidebar on the right) you can use your race and training data to accurately estimate your FTP through the Normalised Power function at the 60 minutes axis point.  If you're unsure just email me and I'll send you a link. 

Ramp Test, MAP Test or Conconi Test.You could do a Ramp Test, a profile of which is seen here, and extrapolate the figures you need from its results.  The final 60 seconds of sustained power are computed and approximately 75% of that gives you your FTP.

An alternative is to carry out a six minute wVO2max Test and extrapolate your figures, from that.  There is also a 20 minute test for slightly more accurate results or you could go the whole hog and do a one hour test (a 25 mile/40k TT) and get pretty much 100% accurate results from that. 

You can also compute your FTP from your lactate threshold as the two are very closely related.  They're not the same but they are near neighbours in the world of FTP figures.

So loads of ways to calculate it so there's no excuses for not having a ball park figure!  You can even do it with heart rate alone, you don't need a power meter, although strictly speaking you obviously won't actually have your functional threshold power figures!

If you're anything like me (an accomplished slacker) you'll find it very difficult to concentrate for a full 60 minutes, especially when it starts hurting and there's no one to talk to.  So a 20 minute test (shown above) is a good a way as any of getting some scores on the doors. 

Crack out a full on 20 minute ride (a 10 mile TT), grab your normalised power figure, and you've got 105% of your functional threshold.  It's not as accurate as a full hour test, but it's less stressful, easier to fit in to a busy schedule, and as close as we need to be for the level of racing and training we undertake.  Remember, this site is written for people who live in the real world!

Realising your potential
Okay, now we've got a figure for our functional threshold what do we do with it?  Functional threshold development is all about making our athletic engine more efficient. 

As a competitive cyclist, raising FTP should be your primary objective.  We need to become more efficient at making use of our overall effectiveness.  Here I'll explain why.

Two riders can have exactly the same relative VO2max, but it will be the one with a higher Functional Threshold Power that prevails come judgement day; or the Island Championships as they're known in Jersey. 

Two club riders may turn out exactly the same power over the course of an hour.  They're physical attributes, heart volume and lung capacity, may differ so their heart rates could be miles apart.  The power outputs and the lines on the wattage graph may be the same but their physiological response, sensations and emotions most definitely won't!

There's more to this game than just high power figures.

Not big and not clever
Power meter users often try to hit the big maximal power numbers to reflect the measure of their prowess on the bike.  Mines bigger than yours type of thing.

I'm sorry to have to disappoint our macho men, but it's the biggest FTP that's going to do the damage when it matters not maximal power output.  You may have a 1000 watt sprint but if you've only got a 200 watt FTP then you ain't going to be around at the end of the race to show everyone what a sprint god you are. 

I've tested some phenomenally strong riders in the lab that would be dropped before they got to the first hill in the 25 mph "race to the base".  As with all things at our level, moderation in everything is the key to success.  It's the lactic threshold, aerobic/anaerobic boundary that determines who'll be around for the sprint.  It isn't necessarily the strongest sprinter in the race that takes home the medals.

You're more likely to be "in for a win" with a 900 watt sprint and a 300 watt FTP.  Just redirect your focus to the less glamorous side of the training spectrum and reap the rewards.

Functional threshold power gives you a baseline from which which you can design your future training levels.  Once you have enough power data to draw a conclusion, changing your FTP is pretty straightforward, it's hardly easy to do but is easy to target; if you get my meaning. 

Sciency Stuff
We've described before that cardiovascular fitness (VO2max) sets the ceiling for aerobic energy production.  The higher your VO2max the more power you can generate "with oxygen".  The blue line limit is, to a certain extent, genetically defined by our heart and lung capacity gifted to us from the genes of our parents. 

Your metabolic fitness (functional threshold) determines how close you can get to that ceiling without generating gallons of debilitating lactic and running out of puff.  That's the diagram above.  This is the bit we can influence through hard work, endeavour and restrained, controlled aggression.

Obviously our intention as a competitive cyclist is to move the red line as close as we can to the blue.  This is how we do it! 

First you need to establish  your FTP baseline.  Re-read the General Consensus text above and decide how you are going to evaluate your current fitness level and determine your functional threshold power. 

Once you have an accurate baseline figure we can now go to town on improving it and transforming your season, your results and quite possibly your sexual prowess.  The final conclusion is from highly anecdotal evidence that has little chance of being peer reviewed; but at least I've now got your interest!

   Coggan's Power Training Levels


Threshold Power = 300 watts

  Purpose % of FTP

Watts

 
1 Active Recovery <55% 165w   Taking your bike for a walk!
2 Endurance >75% 225w   All day pace.
3 Tempo >90% 270w   Chain Gang pace.
4 Lactate Threshold >105% 315w   At or around 25m TT pace
5 VO2max >120% 360w   3-8 minute interval pace
6 Anaerobic 121%+ 360w+   Flamme Rouge SHITS intervals
7 Neuromuscular   >1000w?   Jump Intervals

In the table above we've taken a rider with a a Functional Threshold Power of 300 watts.  If you can knock out a 25 mile TT in or around an hour you're in this region.

The table describes Coggan's Power Levels that have become the benchmark for many power meter users over recent years.  Don't be misled in to thinking the levels are compartmentalised in to "black and white" discrete bins of power and physiological response.  There is a sliding line continuum that blends from one level to the next.  It just fits our mindset better if we put it in to pretty coloured boxes. 

For instance you don't go from below 74% of FTP being wholly Endurance pace and 76% of FTP being wholly Tempo pace.  There is no physiological switch from one level to the next, just a sliding scale of effort that eases across the identified training responses.  However the levels do give us a framework for understanding, developing and structuring, sustained improvement.

Obviously you don't need me to tell you that you can ride for longer at Level 1 than you can at Level 5.  So I'll let Dr Coggan explain through the medium of graphs...

The Physiological Continuum
The Exercise Intensity graphic below is a companion to the Coggan Training Levels in the table above. 

You can see the gently decreasing volume duration line starts in the top left corner (at unit 99), and degrades to finish just before 140% at the bottom right.  It drops through the coloured levels as it moves across the chart, visually indicating a hypothetical duration of effort sustainability at each physiologically identified power level. 

There's a lot of big words close together in the above sentence but what it effectively means is; "The harder you do it, the less time you can do it for". 

The line gently rising from the lower left to the upper right, reflects the physiological strain of your training.  Again, it's fairly obvious that you can undertake many, many days of repeated Level 1 and Level 2 work but less so when you get to Level 5 and 6.   "The harder you go, the more damage it does, the more recovery you need before doing it again".

The dark "camel's hump," reflects the potential each Training Level has for increasing Functional Threshold Power.  Obviously it peaks out in the middle of Level 4.  At this point, physiological strain is increasing and sustainable volume is decreasing.  So although mid-level four appears to give maximum performance return, the physical cost is too high a price to pay for most of us. 

Recovery from a mid-level four session is going to be longer than an upper level 3 session.  Unsurprisingly, muscle trauma is also greater.  Which means you won't be able to undertake another quality workout as quickly as you might like.  So there is a possibility that, over the course of a medium term training period, you may, to a very small extent, detrain in comparison to someone who undertook the level 3 sessions. 

Harder isn't necessarily always better.  So, why not drop back to just under Level 4 and train for a longer duration.  Less physical session advancement but much less physical stress giving you the ability to do another session in a quicker time frame.  Two 60 minute sessions at upper level three will give a better training return than one 90 minute session at mid-level four.  Train smarter not harder!

Theory into Practice
So what does all this mean in the real world?  You can see that the lines above converge at 85% of FTP.  So that's where we train.  Take a test, get a figure, multiply it by 0.85 and go ride at that figure for 2 x 20 minute intervals, twice a week.  It really is that simple!

Below are power charts from my turbo sessions specifically designed to increase FTP.  In the winter preparation phase of my training my FTP is 240w.  As we get to the pre-competition period it's 265w and I'll concentrate on getting it to 300w to 320w for the height of the sportive season.

The graphics below are all taken from the same one hour turbo session.  A thorough progressive warm up, 2 x 20 minutes at threshold, with a four minute recovery between each, and a high-rev cool-down.  Threshold power on the day was 265 watts and the session was undertaken in a nice, warm 16 degrees centigrade watching, the 2007 Paris Roubaix for added motivation.


Here we see the ride broken down in to the specific power training levels described in the charts above.  Just under 40% at Threshold.


This graphic portrays the same information as the above but now we can see the specific power ranges  with each bar representing a 10 watt spread of power.   The ranges to the left are the warm up & cool down.


If you haven't got a power meter you can still get half-decent results with a heart monitor.  Again the same ride by heart rate.  36% in Zone 3 with a little cardiac drift sniff in to Zone 4.


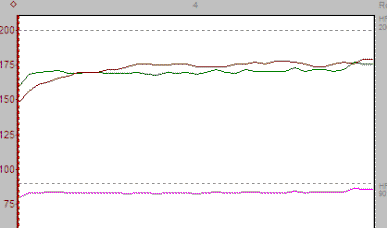
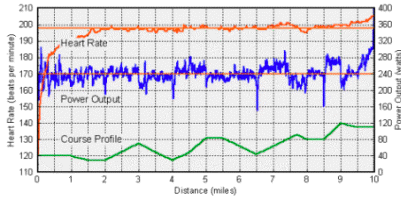
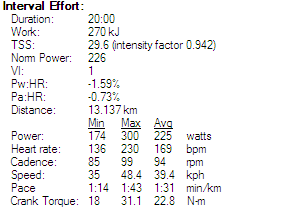
And finally the breakdown of a single interval by numbers.

85% of 265 watts is 225.25 watts.  You can see for yourself it's bang on the money.  In next months sheet I'll explain what all the numbers in the top half mean.  It's the bottom half figures that interest us for now.


Hour of Gain
Most of my turbo sessions are an hour of pain but to be honest, this ones not that painful.  This is a session that really is more gain than pain.  It's not easy by any means, it requires concentration, control, a determination to hold back and a big fan to keep you cool!

The FTP development Session consist of;

10 minute controlled warm up with bursts up to FTP
20 minutes @ 85% FTP
4 minutes recovery @ 150 watts maximum
20 minutes @ 85% FTP
6 minutes cool down spinning at 100 rpm

Six weeks on from my sessions above, I knocked out the interval below.  With results you can all see and achieve yourselves.

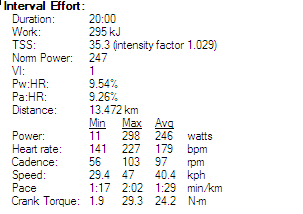
A refreshing 21 watt increase, or 10% if you wish!

Heart rate up 10 beats which for me isn't a lot, you can see my max of 230 ish!

Speed up 1 kph , revs up 3 rpm and an increased distance of  335 meters.  Job done.
 

To summarize
So there it is.  Get tested, by doing it yourself or in a lab; get your Functional Power Threshold numbers, do some really easy maths, train at the right level twice a week for three weeks.  Take a recovery week, measure yourself again and recalculate the figures for your next batch of three weeks' sessions.

It really is that simple and that quick.  And it's a 100% sure fire hit of increasing your threshold, your performance and your enjoyment on the bike.  Other than a race win, there is little more satisfying experience on a bike than knowing the training your doing is bringing results.  It's such a gratifying feeling, as an athlete and a coach, to see immediate, sustained, measurable progression.

If the rewards aren't enough to accept the lack of variety, then don't feel there isn't an alternative.  These intervals don't have to be carried out as an exclusive session.  Why not do a one hour turbo session in the week based on this work out.  Then include the other 20 minute sessions as part of a road ride.  I try to get my big distance sportive riders and Iron Man athletes to include a 20 minute controlled burn up in every hour of their long weekend rides as part of their Pre-Competition build up.  The results they bring, as you can see, are spectacular.

The Message
Hopefully this factsheet has provided the information to help you take your threshold power to the next level.  You don't advance your power output by riding around for three hours on a club run at whatever speed the leaders choose; or knocking out 1000 watt intervals for 5 seconds at a time.  There is a sweet spot or, as you'll find when banging it out on the turbo, a sweat spot, that brings returns that far exceed the perceived effort.  And I'll vote for that any day.

These intervals should not be a bare all, gritted teeth, hang on for grim death, type effort.  They should be a controlled effort on the edge of aerobicity (my new word from last month!).  You are not Einstein, you  can't redefine the laws of physics.  The maths, the workout and the results are simple;

85% of FTP for 20 mins = continuous improvement

So stay at that intensity and reap the rewards.  If you want to make the interval harder, cut the rest interval by one minute per week.  Then after your recovery week, increase the effort and reinstate the 4 minute recovery period.  DON'T increase the wattage because you think you can.  Of course you can pedal as hard as you want you just won't get the results you were expecting.  Reign it in and wait for the gains to arrive; show restraint and save your pent up energy for the race.

Functional Threshold Power can be described to a layman as "how fast you can cruise."   Cruising plays a major part in endurance sports such as cycling and being efficient at high cruising speeds is our ultimate aim.  The fresher you are when you get to the finish the better position you'll be in physically and mentally for the finale of the end game and the race winning sprint.  Enjoy the rewards of your 85% efforts because they bring 100% results.

And if anyone has any information to backup the sexual prowess claim, feel free to email me and I'll share it with our ever increasing world-wide readership!

Until next time...


And

Road Wheel Weights - http://schwabcycles.com/about/wheel-comparison-weights-pg292.htm

|

Wheel Comparison Weights

Road Wheel Weights

Brand Front Rear Pair       Brand Front Rear Pair
Rolf Aspin SL
615 895 1510 Torelli Borimo Blade 1620
Rolf Aspin 640 965 1605 Torelli Bormio SL 1580
Rolf Echelon SL 705 990 1695 Torelli Bormio Ceramic Hybrid 1540
Rolf Echelon 725 1040 1765 Torelli Bormio Ceramic Ultra-lite 1380
Rolf Èlan 575 770 1345 Torelli Bormio Pista Wheels 1960
Rofl Èlan RS 600 820 1420
Rolf Vigor RS 680 915 1595 Easton EA-50 1735
Rolf Vigor SL 635 815 1450 Easton EA-50 SL
1697
Rolf Carbon TdF38 - Clincher 735 960 1695 Easton EA-70 X
1650
Rolf Carbon TdF38 Tubular
495 690 1185 Easton EA-70 1650
Rolf CarbonTdF58 Clincher
790 990 1780 Easton EC-70 SL Carbon
1695
Rolf CarbonTdF58 Tubular
560 770 1330 Easton EA-90 Aero
1545
Rofl Track Alloy 855 955 1810 Easton EA-90 TT
1575
Rolf 58 Track Tubular
815 930 1745 Easton EA-90 SL
1530
Easton EA-90 SLX
1395
Mavic Speedcity 870 1100 1970 Easton EC-90 SL Carbon Clincher
1465
Mavic Askium 830 965 1795 Easton EC-90 SL Carbon Tubular
1250
Mavic Ksyrium Equipe Easton EC-90 SLX Carbon Tubular
1175
Mavic Ksyrium Elite 675 875 1550 Easton EC-90 TKO Carbon Tubular
1545
Mavic Ksyrium  SL
645 840 1485 Easton EC-90 Areo Carbon Tubular
1335
Mavic R-Sys 590 800 1390 Easton EC-90 TT Carbon Tubular
666 758 1425
Mavic R-Sys Premium 590 795 1385
Mavic R-Sys SL 545 750 1295 Shimano WH-500 1944
Mavic Cosmic Elite 890 1010 1900 Shimano WH-RS20
1839
Mavic Cosmic Carbone SL 780 960 1740 Shimano WH-RS30
1516
Mavic Cosmic Carbone SLR 725 870 1595 Shimano WH-RS-80 1516
Mavic Cosmic Carbone Ultimate Tubular
520 665 1185 Shimano WH-6700 (Ultegra)
1651
Mavic Cosmic Carbone SL PowerTap 780 1120 1900 Shimano WH-7850-SL  (Tubeless)
1531
Mavic Cosmic Carbone Pro PowerTap Tubular
710 1070 1780 Shimano WH-7850-C24-CL 1391
Mavic Ellipse (Track)
955 1040 1995 Shimano WH-7850-C24-TL (Tubeless)
1458
Shimano WH-7850-C50-CL 1631
Campagnolo Hyperon Ultra Two Clincher 580 765 1345 Shimano WH-7850-C-24-TL (Tubular)
1254
Campagnolo Hyperon Ultra Two Tubular 536 695 1231 Shimano WH-7850-C50-TU (Tubular)
1485
Campagnolo Hyperon One Clincher 615 765 1380
Campagnolo Neutron Ultra Clincher 630 840 1470 Zipp 101 Clincher 686 798 1484
Campagnolo Neutron Clincher 660 890 1550 Zipp 202 Tubular 484 611 1095
Campagnolo Shamal Ultra 2-Way Fit 615 825 1430 Zipp 303 Clincher
749 874 1623
Campagnolo Shamal Ultra Clincher
605 820 1425 Zipp 303 Tubular
519 652 1171
Campagnolo Shamal Ultra Tubular
612 813 1425 Zipp 303 Cyclocross Tubular
554 652 1206
Campagnolo Eurus 2-Way Fit 643 857 1500 Zipp 404 Clincher
772 886 1658
Campagnolo Eurus Clincher
634 848 1482 Zipp 404 Tubular
582 696 1278
Campagnolo Zonda 2-Way Fit
680 900 1580 Zipp 404 Cyclocross Tubular
618 713 1331
Campagnolo Zonda Clincher
670 885 1555 Zipp 404 Max Clincher
808 903 1711
Campagnolo Scirocco Clincher 775 1020 1795 Zipp 404 MaxTubular 618 713 1331
Campagnolo Vento Reaction Clincher 825 1002 1827 Zipp 404 Track Tubular
828 902 1730
Campagnolo Khamsin 878 1078 1953 Zipp 808 Clincher 902 1019 1921
Campagnolo Bora Ultra Two 575 745 1320 Zipp 808 Tubular
691 808 1499
Campagnolo Bora One 590 760 1350 Zipp 808 Max Clincher
934 1036 1970
Campagnolo Ghibli Ultra Disc
1010 Zipp 808 Max Tubular
724 826 1550
Campagnolo Ghibli Pista
955 995 1950 Zipp 808 Track Tubular
874 970 1844
Campagnolo Pista Tubular 995 1040 2035 Zipp 900 Disc Clincher 
1219
Zipp 900 Disc Tubular 936
Reynolds Assualt Carbon Clincher 1525 Zipp1080 Clincher
1122 1225 2337
Reynolds Assualt Carbon Tubular 1330 Zipp1080 Tubular 793 906 1699
Reynolds Attack Carbon Clincher 1450 Zipp Sub-9 Disc Tubular 998
Reynolds Solitude (20/24 Spokes) 1590 Zipp Super-9 Disc Tubular
995
Reynolds Solitude (16/20 Spokes)
1540 Zipp 303 Clincher Power Tap 749 1085 1834
Reynolds Strike Carbon Clincher
1705 Zipp 303 Tubular Power Tap 519 862 1381
Reynolds DV3K Carbon Clincher
1500 Zipp 404 Clincher Power Tap 772 1121 1893
Reynolds DV3K CarbonTubular 1320 Zipp 404 Tubular Power Tap 582 931 1513
Reynolds DV46 UL Carbon Clincher
1410 Zipp 808 Clincher Power Tap 902 1277 2179
Reynolds DV46 UL Carbon Tubular
1155 Zipp 808 Tubular Power Tap 691 1052 1743
Reynolds DV32 UL Carbon Clincher
1320
Reynolds DV32 UL Carbon Tubular
1040 Fulcrum Racing Light XLR Clincher 595 750 1345
Reynolds SDV66 Carbon Tubular 1390 Fulcrum Racing Light XLR Tubular 546 680 1226
Reynolds Element Carbon Clincher Double Disc
1355 Fulcrum Racing Speed XLR Tubular
577 747 1324
Reynolds Element Carbon Tubular Double Disc
1205 Fulcrum Racing Speed Tubular
590 770 1360
Reynolds Element SDV66 Carbon Clincher
2125 Fulcrum Racing Crono Tubular Disc
1010
Reynolds Element SDV66 Carbon Tubular
1835 Fulcrum Racing Zero (2-Way Fit)
625 835 1460
Reynolds SDV66 Track Carbon Clincher 1945 Fulcrum Racing 1 (2-Way Fit)
645 860 1505
Reynolds SDV66 Track Carbon Tubular 1660 Fulcrum Racing 3 (2-Way Fit)
680 915 1595
Fulcrum Racing Zero Clincher
610 825 1435
Fulcrum Racing Zero Tubular
615 815 1430
Fulcrum Racing 1 Clincher
635 850 1485
Fulcrum Racing 3 Clincher
736 923 1659
Fulcrum Racing 5 Clincher
775 985 1760
Fulcrum Racing 7 Clincher
855 1075 1930

And
prev | 1 | 2 | next